前言
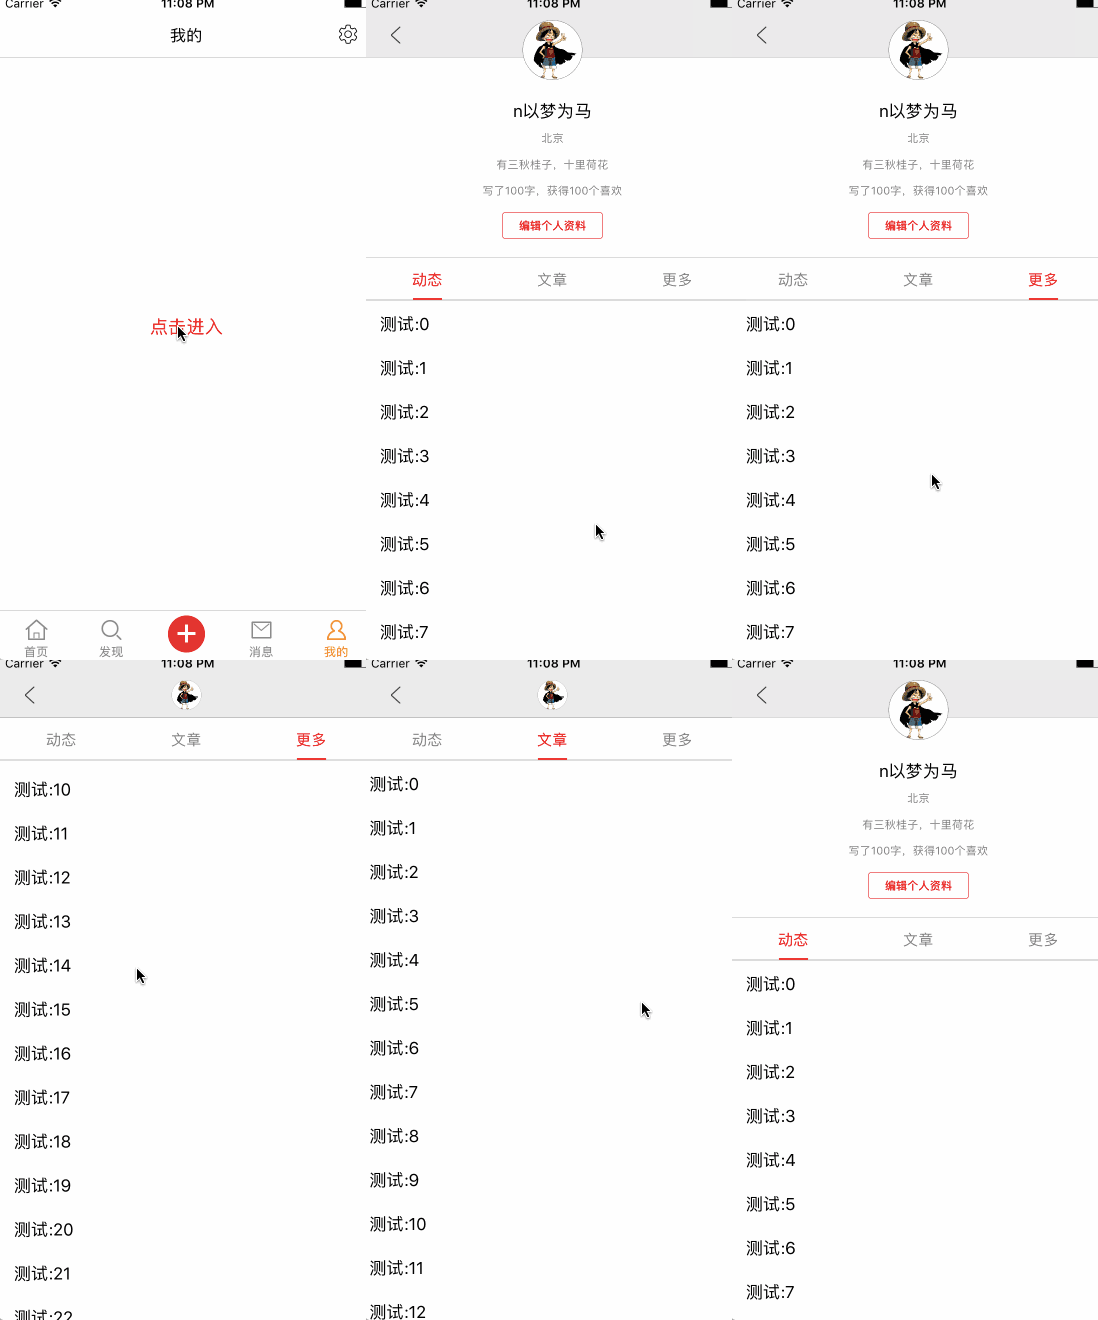
之前项目中很多地方用到了滑动视图,三个界面五个界面或界面个数不定的情况都有,这里以简书 APP 的个人主页为例,总结一下,一则对自己也有好处,二则希望对看到的朋友有所帮助。


思路及核心代码
思路:
- 导航栏上面的头像会随着视图的上下滑动而变大变小,这里注册了一个通知,用来监听视图的上下滑动,可以根据偏移量的值来改变头像的大小。
- 此 UI 页面分为三部分,第一部分是信息展示,用来显示昵称签名等;第二部分是标签栏,即“动态”,“文章”,“更多”这三个标签;第三部分是主要显示内容;
- 我这里用了这样的思路:页面底部是一个 UIScrollView; 接着 UIScrollView 上面 add 了三个 UITableView ;信息展示以及标签栏放在 UITableView 的 tableHeaderView 中;接着挨个实现其功能即可。
核心代码:
- 头像跟随页面上下滑动而变大变小
- 这里是头像变大变小时调用的代码,如果你的项目中用到了此功能,可以直接把这个类拿过去,然后调用下面这几句代码就可以实现了。另外点击头像的回调也通过 block 传了出来,你可以在此处做些操作,比如更改头像等等。
1
2
3
4
5
6
|
    self.headerImageView          = [[NNPersonalHomePageHeaderImageView alloc] initWithImage:[UIImage imageNamed:@"header"]];
    [self.headerImageView reloadSizeWithScrollView:self.dynamicTableView];
    self.navigationItem.titleView = self.headerImageView;
    [self.headerImageView handleClickActionWithBlock:^{
        NSLog(@"你点击了头像按钮");
    }];
|
- tableView 的头部视图
- 这里另外建了两个 UIView 类,一个用来显示基本信息(昵称签名等),一个用来显示标签栏(动态,文章等标签),额外建这两个 UIView 类是为了减少控制器中的代码。
 1
 2
 3
 4
 5
 6
 7
 8
 9
10
11
12
13
14
15
16
17
18
19
20
21
22
23
24
25
26
|
- (void)setupHeaderView {
    UIView *headerView                     = [[NNPersonalHomePageHeaderView alloc] init];
    headerView.frame                       = CGRectMake(0, 0, NNScreenWidth, NNHeadViewHeight + NNTitleHeight);
    [self.view addSubview:headerView];
    self.headerView                        = headerView;
    NNPersonalHomePageTitleView *titleView = [[NNPersonalHomePageTitleView alloc] init];
    [headerView addSubview:titleView];
    self.titleView                         = titleView;
    titleView.backgroundColor              = [UIColor whiteColor];
    [titleView mas_makeConstraints:^(MASConstraintMaker *make) {
        make.left.right.mas_equalTo(headerView);
        make.bottom.equalTo(headerView.mas_bottom);
        make.height.mas_equalTo(NNTitleHeight);
    }];
    [self.scrollView mas_makeConstraints:^(MASConstraintMaker *make) {
        make.left.right.bottom.equalTo(self.view);
        make.top.mas_equalTo(headerView.top);
    }];

    __weak typeof(self) weakSelf = self;
    titleView.titles             = @[@"动态", @"文章", @"更多"];
    titleView.selectedIndex      = 0;
    titleView.buttonSelected     = ^(NSInteger index){
        [weakSelf.scrollView setContentOffset:CGPointMake(NNScreenWidth * index, 0) animated:YES];
    };
}
|
- 主要内容
- 主要内容就是页面下部展示的具体内容,这里用了三个 UITableView ,依次添加到 UIScrollView 中,这里代码有些臃肿,后期再做优化,有兴趣的童鞋也可以帮忙改一下哈。
 1
 2
 3
 4
 5
 6
 7
 8
 9
10
11
12
13
14
15
16
17
18
19
20
21
22
23
24
25
26
27
28
29
30
31
32
33
34
35
36
37
38
39
40
41
42
43
44
45
46
47
48
49
50
51
52
|
/// 主要内容
- (void)setupContentView {
    NNContentScrollView *scrollView           = [[NNContentScrollView alloc] init];
    scrollView.delaysContentTouches           = NO;
    [self.view addSubview:scrollView];
    self.scrollView                           = scrollView;
    scrollView.pagingEnabled                  = YES;
    scrollView.showsVerticalScrollIndicator   = NO;
    scrollView.showsHorizontalScrollIndicator = NO;
    scrollView.delegate                       = self;
    scrollView.contentSize                    = CGSizeMake(NNScreenWidth * 3, 0);
    UIView *headView                          = [[UIView alloc] init];
    headView.frame                            = CGRectMake(0, 0, 0, NNHeadViewHeight + NNTitleHeight);
    self.tableViewHeadView = headView;

    NNContentTableView *dynamicTableView = [[NNContentTableView alloc] init];
    dynamicTableView.delegate            = self;
    dynamicTableView.separatorStyle      = UITableViewCellSeparatorStyleNone;
    self.dynamicTableView                = dynamicTableView;
    dynamicTableView.tableHeaderView     = headView;
    [scrollView addSubview:dynamicTableView];
    [dynamicTableView mas_makeConstraints:^(MASConstraintMaker *make) {
        make.left.equalTo(scrollView);
        make.width.mas_equalTo(NNScreenWidth);
        make.top.equalTo(self.view);
        make.bottom.equalTo(self.view);
    }];

    NNContentTableView *articleTableView = [[NNContentTableView alloc] init];
    articleTableView.delegate            = self;
    articleTableView.separatorStyle      = UITableViewCellSeparatorStyleNone;
    self.articleTableView                = articleTableView;
    articleTableView.tableHeaderView     = headView;
    [scrollView addSubview:articleTableView];
    [articleTableView mas_makeConstraints:^(MASConstraintMaker *make) {
        make.left.equalTo(scrollView).offset(NNScreenWidth);
        make.width.equalTo(dynamicTableView);
        make.top.bottom.equalTo(dynamicTableView);
    }];

    NNContentTableView *moreTableView = [[NNContentTableView alloc] init];
    moreTableView.delegate            = self;
    moreTableView.separatorStyle      = UITableViewCellSeparatorStyleNone;
    self.moreTableView                = moreTableView;
    moreTableView.tableHeaderView     = headView;
    [scrollView addSubview:moreTableView];
    [moreTableView mas_makeConstraints:^(MASConstraintMaker *make) {
        make.left.equalTo(scrollView).offset(NNScreenWidth * 2);
        make.width.equalTo(dynamicTableView);
        make.top.bottom.equalTo(dynamicTableView);
    }];
}
|
- 左右或上下滑动页面
- 这里为 UIScrollView 添加了代理,一旦滑动视图,便会调用下面这两个方法。为了区分是左右滑动还是上下滑动,这里做了简单的判断,
if (scrollView == self.scrollView),那么这就是左右滑动,因为 UITableView 是上下滑动的,所有左右滑动就是 UIScrollView 的滑动,需要切换 UITableView 的显示内容,在这里做相应的操作即可;如果 if (scrollView == self.scrollView || !scrollView.window) 这个条件不成立,那么就是 UITableView 的滑动,就是上下滑动,在这里需要改变“标签栏”的frame,因为“标签栏”需要显示在导航栏下边位置。
 1
 2
 3
 4
 5
 6
 7
 8
 9
10
11
12
13
14
15
16
17
18
19
20
21
22
23
24
25
26
27
28
29
30
31
32
33
34
35
36
37
38
39
40
41
|
#pragma mark - UIScrollViewDelegate
- (void)scrollViewDidEndDecelerating:(UIScrollView *)scrollView {
    if (scrollView == self.scrollView) {
        CGFloat contentOffsetX       = scrollView.contentOffset.x;
        NSInteger pageNum            = contentOffsetX / NNScreenWidth + 0.5;
        self.titleView.selectedIndex = pageNum;
    }
}

- (void)scrollViewDidScroll:(UIScrollView *)scrollView {
    if (scrollView == self.scrollView || !scrollView.window) {
        return;
    }
        CGFloat offsetY      = scrollView.contentOffset.y;
        CGFloat originY      = 0;
        CGFloat otherOffsetY = 0;
    if (offsetY <= NNHeadViewHeight) {
        originY              = -offsetY;
        if (offsetY < 0) {
        otherOffsetY         = 0;
        } else {
        otherOffsetY         = offsetY;
        }
    } else {
        originY              = -NNHeadViewHeight;
        otherOffsetY         = NNHeadViewHeight;
    }
    self.headerView.frame = CGRectMake(0, originY, NNScreenWidth, NNHeadViewHeight + NNTitleHeight);
    for ( int i = 0; i < self.titleView.titles.count; i++ ) {
        if (i != self.titleView.selectedIndex) {
            UITableView *contentView = self.scrollView.subviews[i];
            CGPoint offset = CGPointMake(0, otherOffsetY);
            if ([contentView isKindOfClass:[UITableView class]]) {
                if (contentView.contentOffset.y < NNHeadViewHeight || offset.y < NNHeadViewHeight) {
                    [contentView setContentOffset:offset animated:NO];
                    self.scrollView.offset = offset;
                }
            }
        }
    }
}
|
上面只是简单的介绍下,具体的代码还请到 demo 中查看,如有疑问或有建议的地方,欢迎讨论。

