最近项目不算紧,于是就学了学 Swift ,看了一大神写的项目https://github.com/hrscy/DanTang,很受益,感谢开源!另外自己也写了一些基础代码,分享出来,第一是希望得到同行前辈的指导,第二是希望对需要的朋友有所帮助。
先分享一些学习资料:
练习的 demo 地址: https://github.com/liupengkun1993/NNMintFurniture
- 主要包括以下功能:
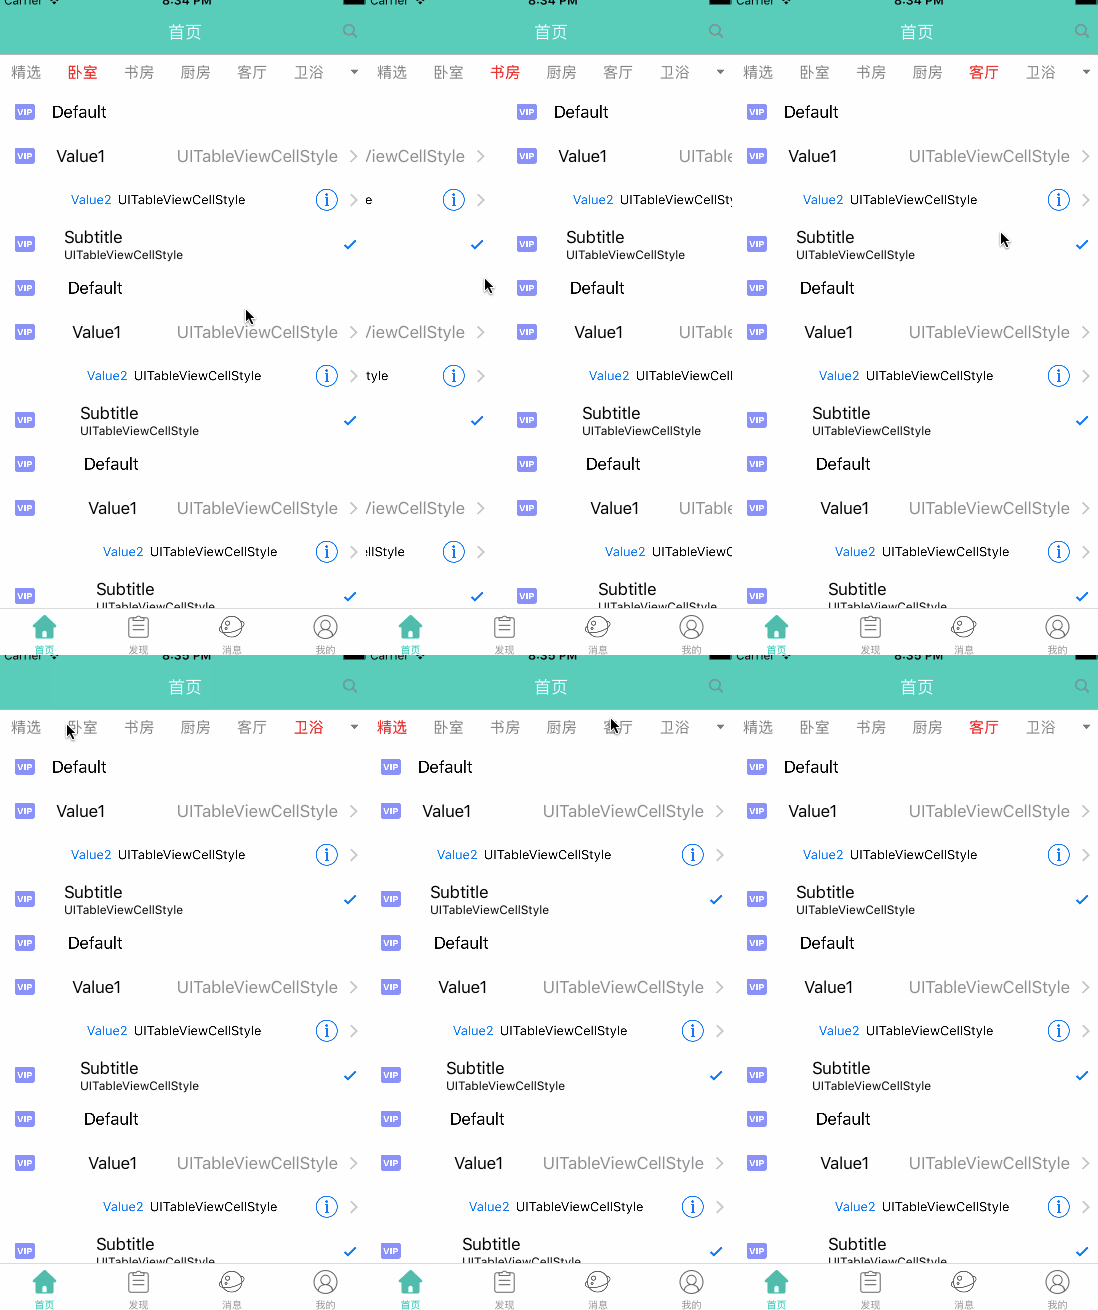
- 多页面滑动视图(分页控制器)
- 图片轮播
- 导航栏渐变
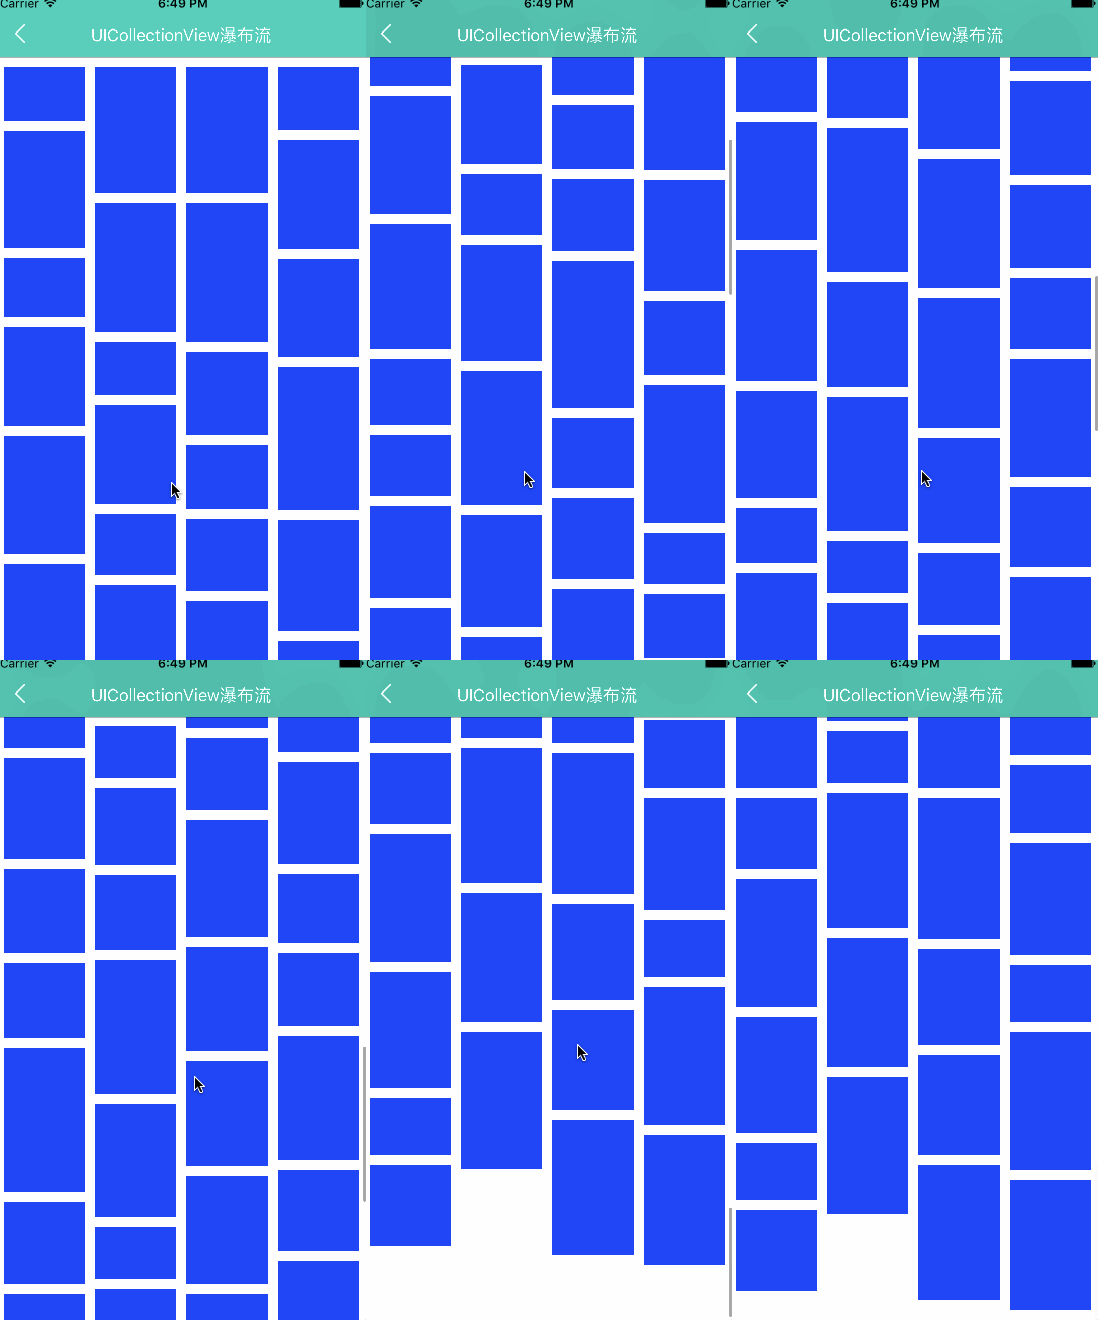
- 瀑布流练习
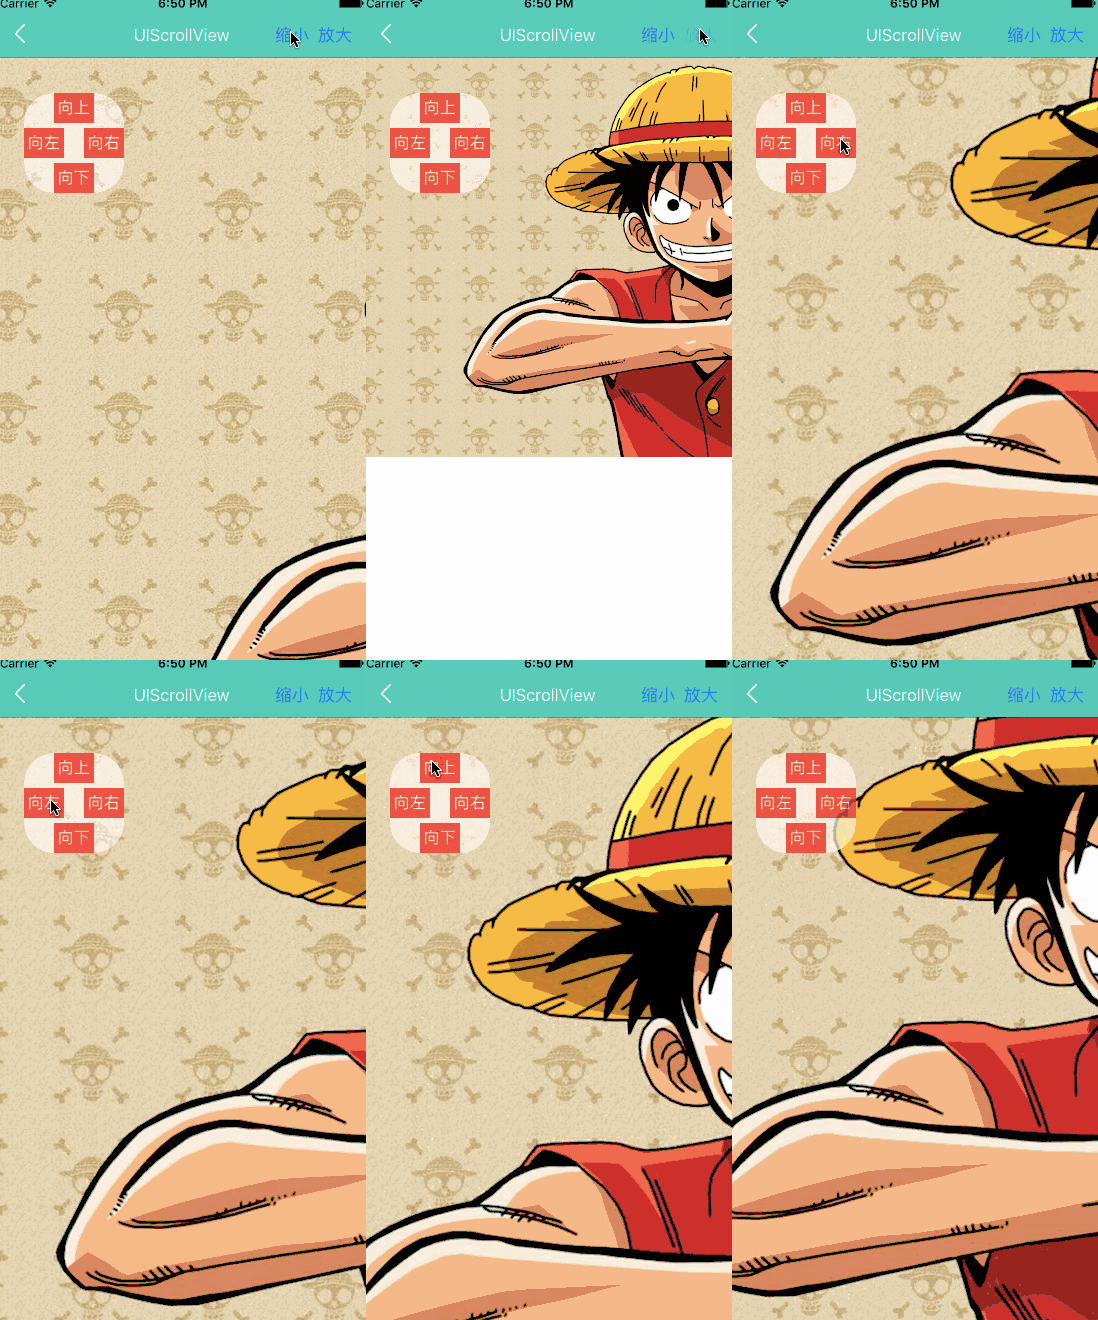
- UIScrollView 练习
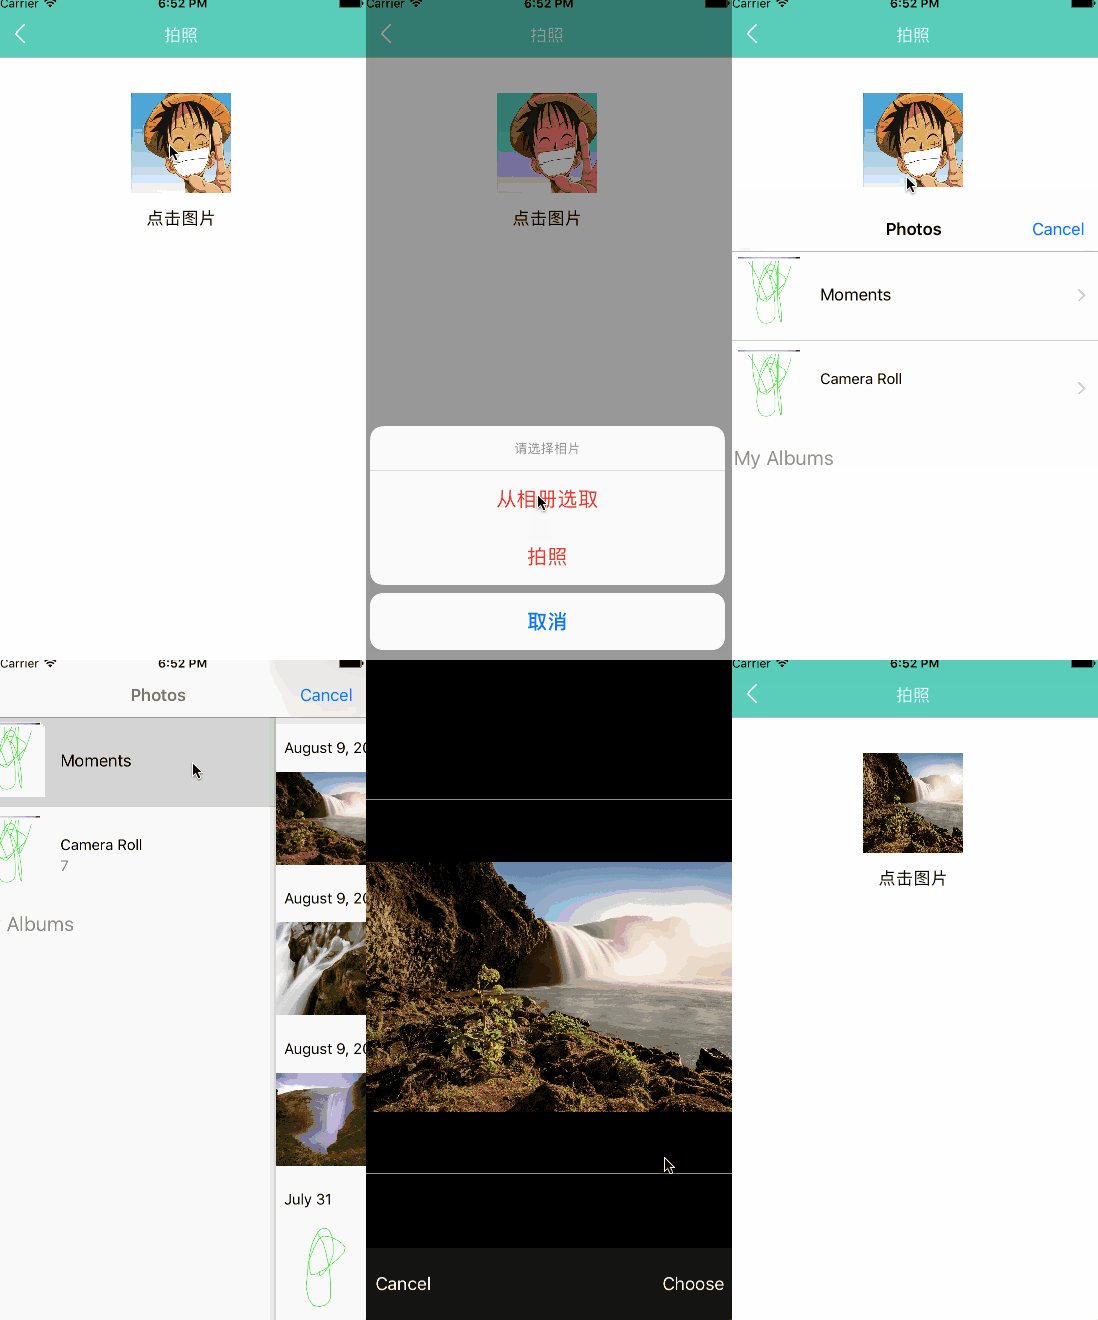
- 照相功能,更换头像
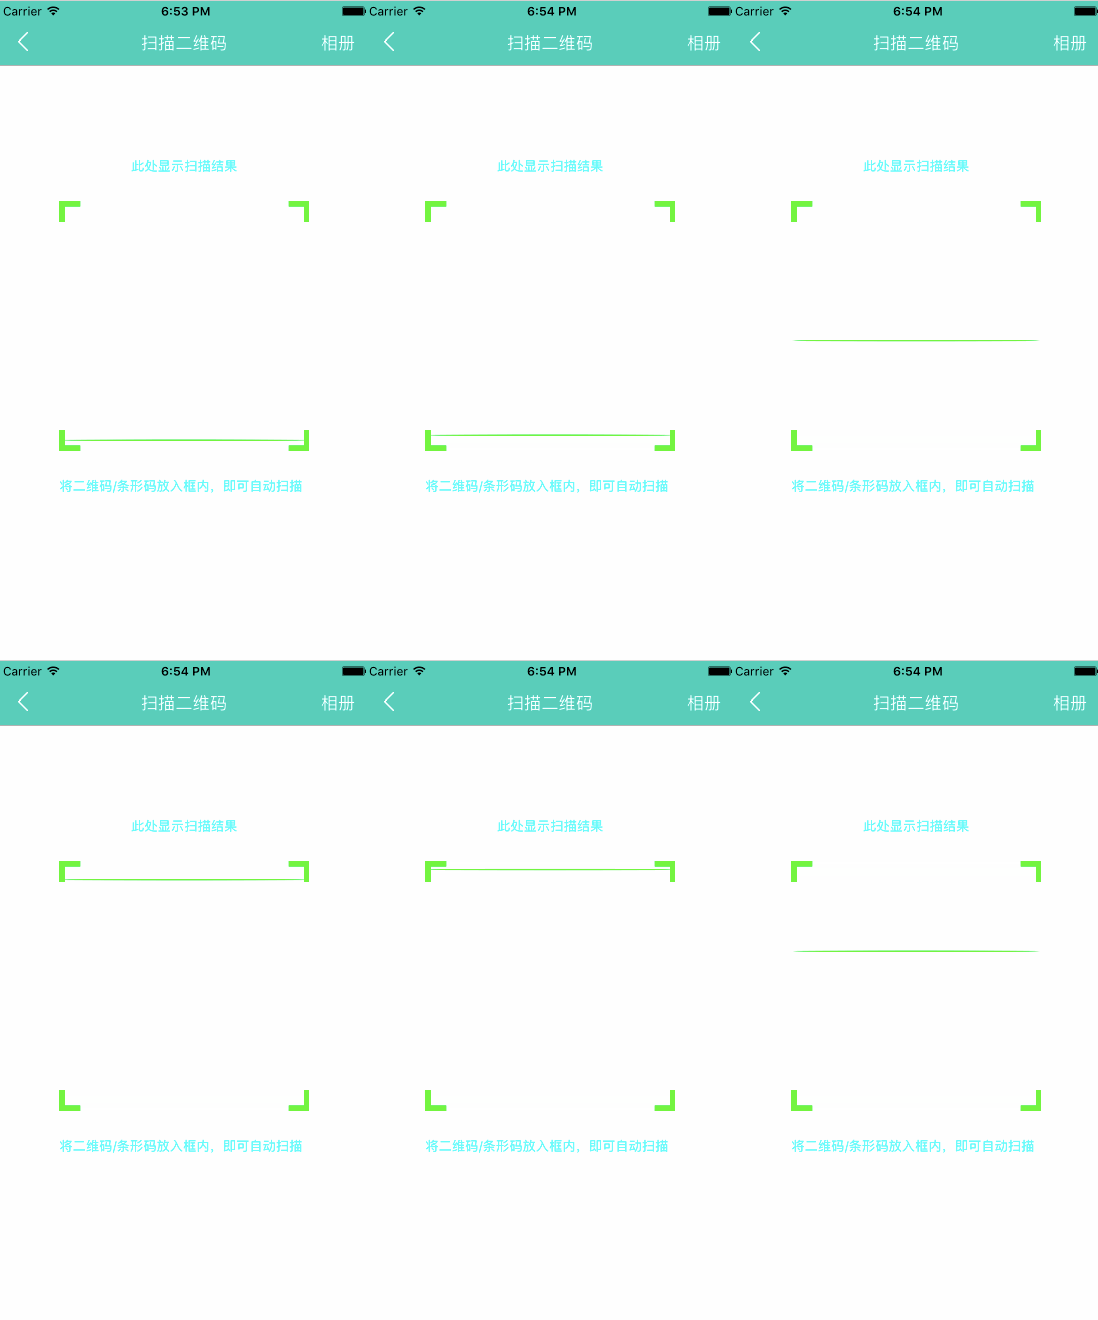
- 二维码扫描及识别
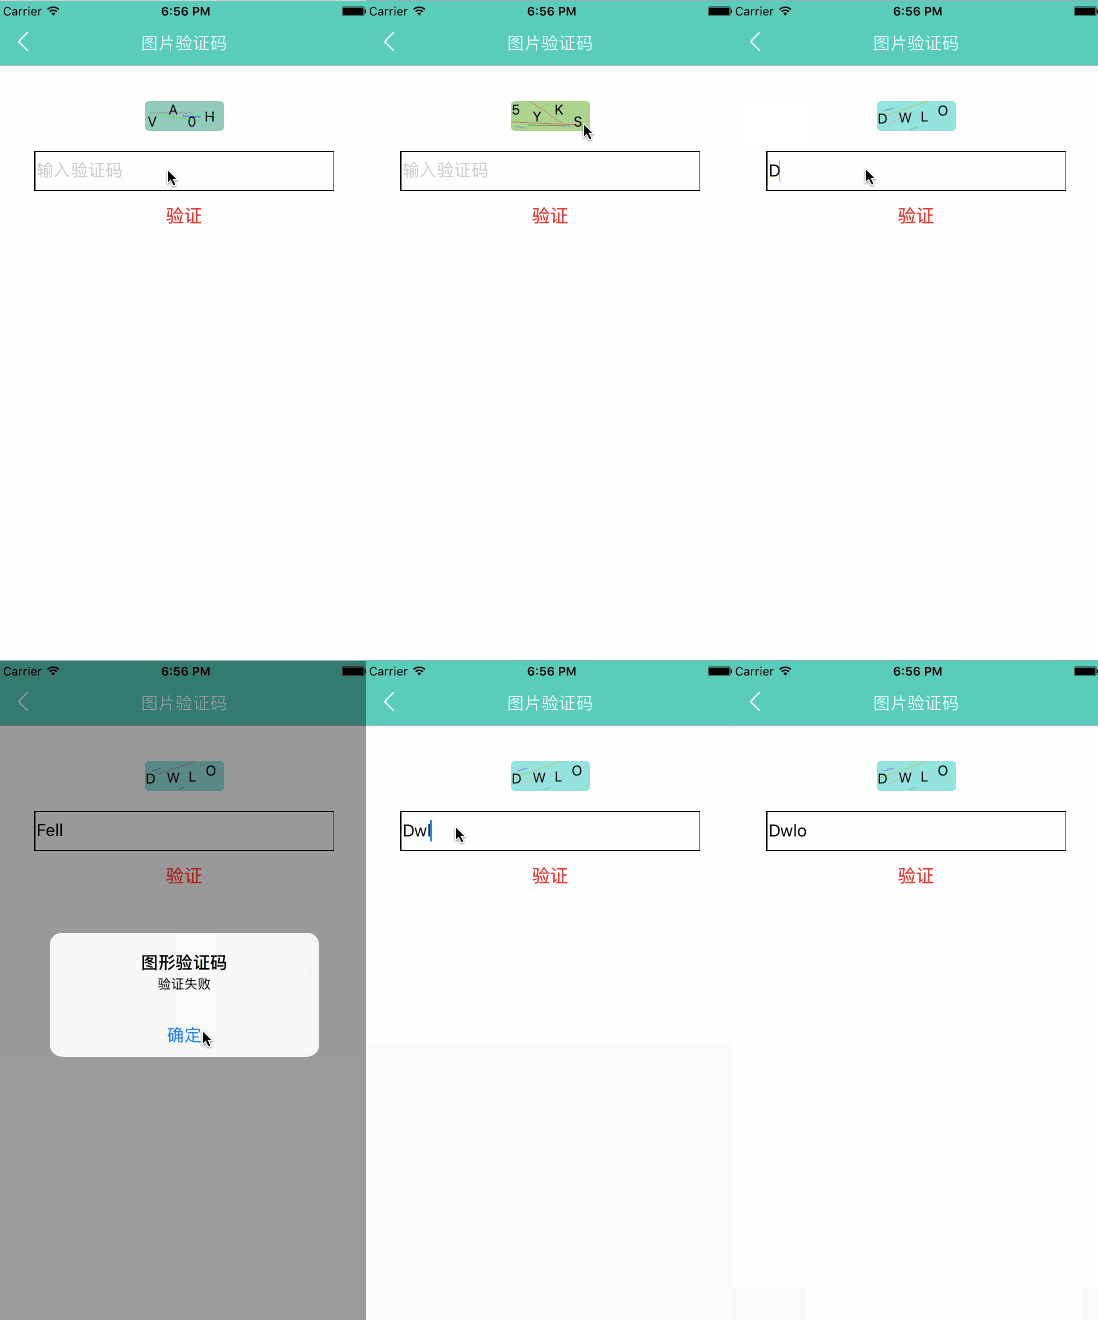
- 随机图片验证码封装
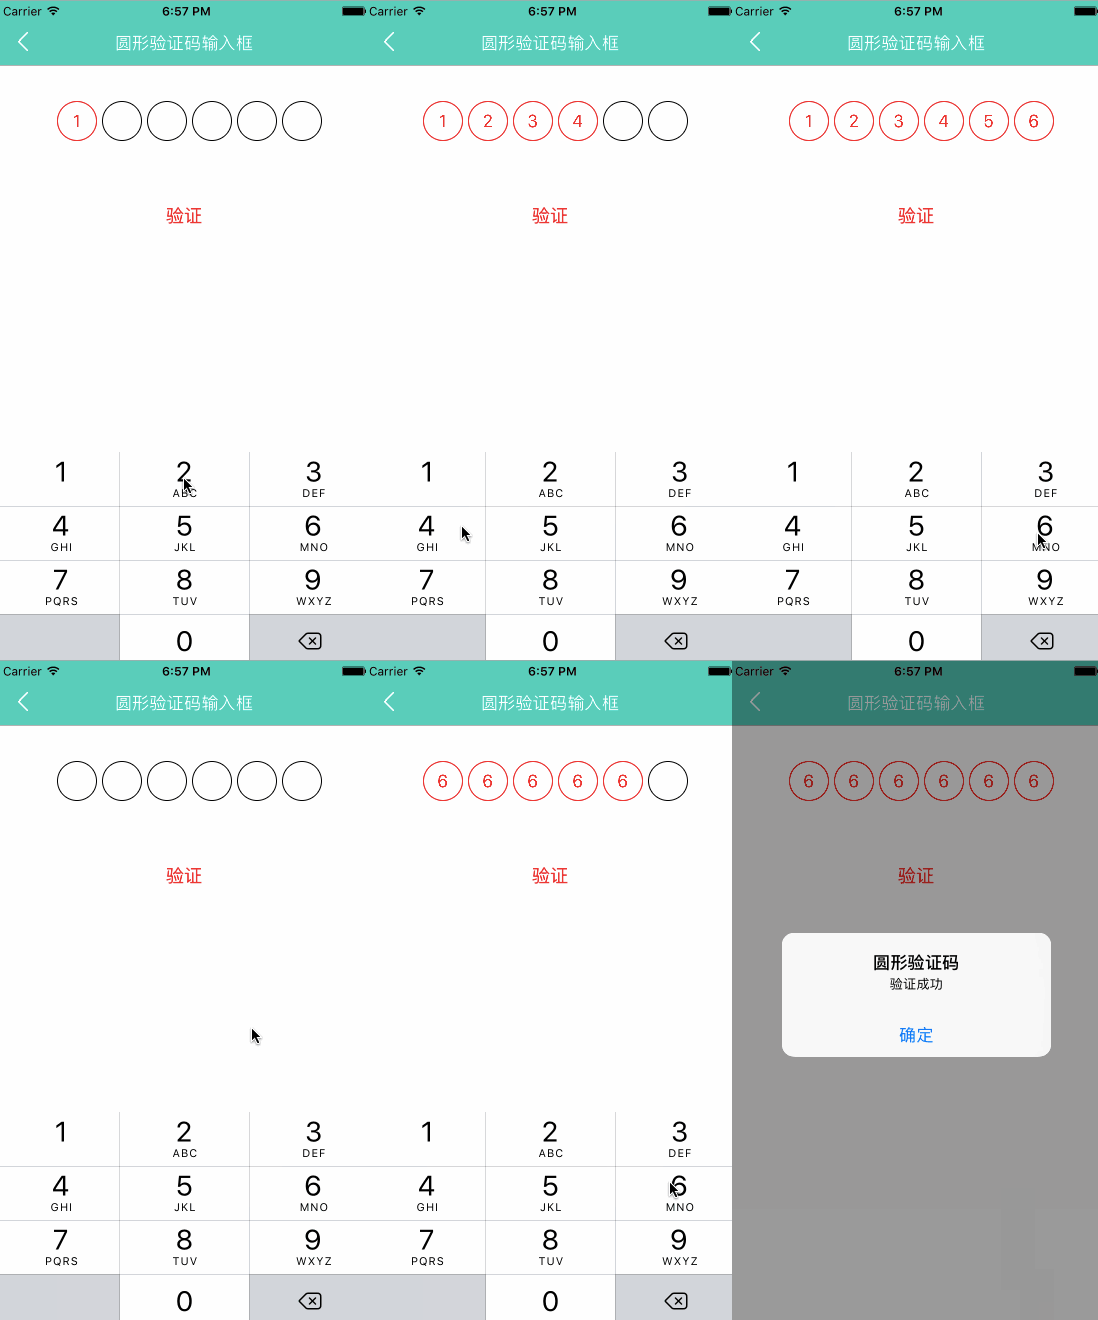
- 圆形输入框封装
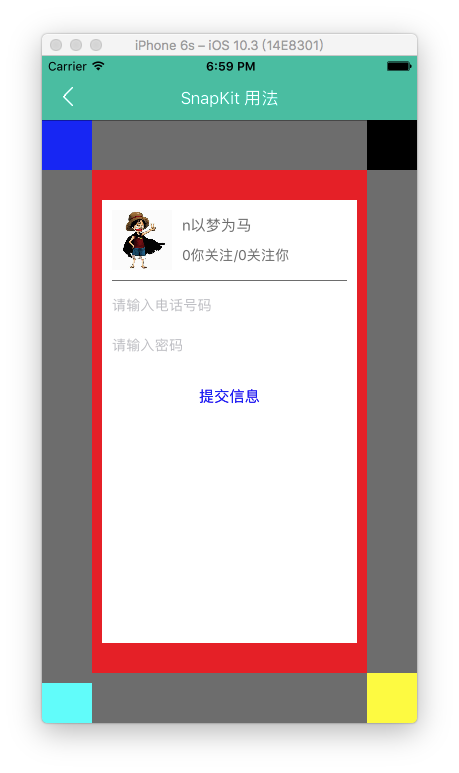
- 第三方库 SnapKit 用法
- …………
练习 demo 的简单介绍,前方高能预警,大量图片请注意手机流量!
一、多页面滑动视图(分页控制器)
 1
 2
 3
 4
 5
 6
 7
 8
 9
10
11
12
13
14
15
16
17
18
19
20
21
22
23
24
25
26
27
28
29
30
31
32
33
34
35
36
37
38
39
40
41
42
43
44
45
46
47
|
    // MARK: 点击了标签栏
    func titlesClick(button: UIButton) {
        selectedButton!.isEnabled = true
        selectedButton!.setTitleColor(UIColor.gray, for: .normal)
        button.isEnabled = false
        selectedButton = button
        selectedButton?.setTitleColor(UIColor.red, for: .normal)

        var offset = contentView!.contentOffset
        offset.x = CGFloat(button.tag) * (contentView?.frame.size.width)!
        contentView!.setContentOffset(offset, animated: true)
    }

    // MARK: 点击了右边搜索框
    func rightBarButtonClick() {
        navigationController?.pushViewController(NNSearchController(), animated: true)
    }

    // MARK: 点击了箭头
    func arrowButtonClick(button: UIButton) {
        UIView.animate(withDuration: 0.25) {
            button.imageView?.transform = button.imageView!.transform.rotated(by: CGFloat(Double.pi))
        }
    }

    // MARK: - UIScrollViewDelegate 代理
    // MARK: scrollViewDidEndScrollingAnimation
    func scrollViewDidEndScrollingAnimation(_ scrollView: UIScrollView) {
        let index = Int(scrollView.contentOffset.x / scrollView.frame.size.width)
        // 取出子控制器
        let vc = childViewControllers[index]
        vc.view.frame.origin.x = scrollView.contentOffset.x
        vc.view.frame.origin.y = 0
        // 设置控制器的 view 的 height 值为整个屏幕的高度
        vc.view.frame.size.height = scrollView.frame.size.height
        scrollView.addSubview(vc.view)
    }

    // MARK: scrollViewDidEndDecelerating
    func scrollViewDidEndDecelerating(_ scrollView: UIScrollView) {
        scrollViewDidEndScrollingAnimation(scrollView)
        // 当前索引
        let index = Int(scrollView.contentOffset.x / scrollView.frame.size.width)
        // 点击 Button
        let button = titlesView.subviews[index] as! UIButton
        titlesClick(button: button)
    }
|
二、图片轮播
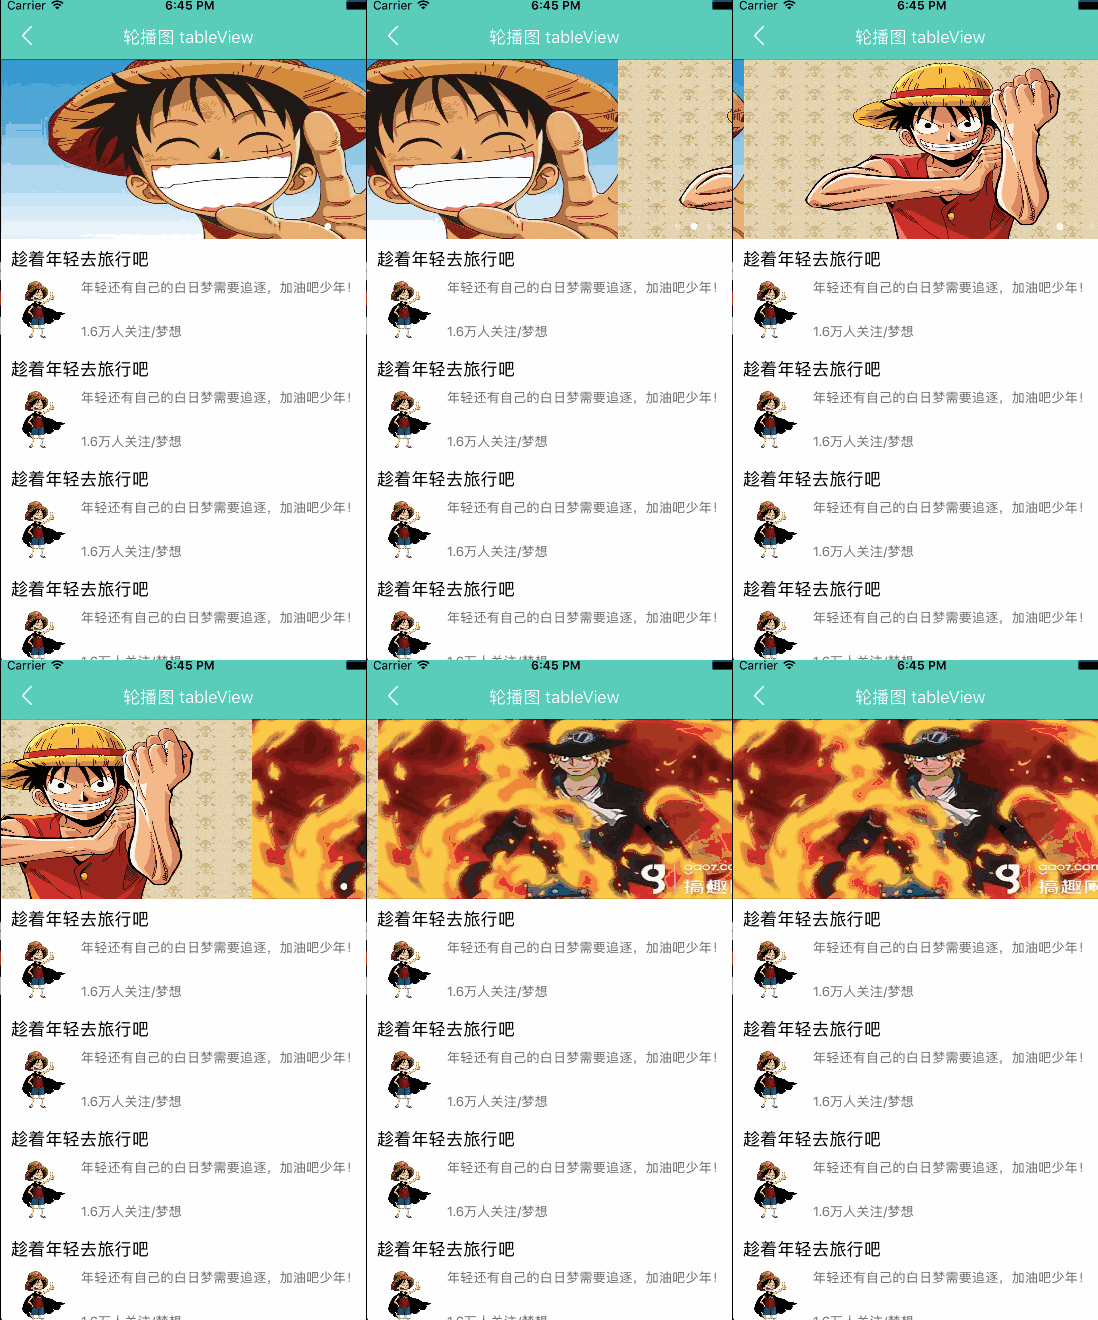
轮播图的封装
1
2
3
4
5
6
7
8
|
    // MARK: - 懒加载轮播视图
    private lazy var shufflingFigureView : NNShufflingFigureView = {
        let frame = CGRect(x: 0, y: 0, width: NNScreenWidth, height: 180)
        let imageView = ["shuffling1", "shuffling2", "shuffling3", "shuffling4"]
        let shufflingFigureView = NNShufflingFigureView(frame: frame, images: imageView as NSArray, autoPlay: true, delay: 3, isFromNet: false)
        shufflingFigureView.delegate = self
        return shufflingFigureView
    }()
|
通过代理处理图片的点击事件
1
2
3
4
5
6
|
// MARK: - 轮播代理方法,处理轮播图的点击事件
extension NNItemTableViewController: NNShufflingFigureViewDelegate {
    func addShufflingFigureView(addShufflingFigureView: NNShufflingFigureView, iconClick index: NSInteger) {
        print(index)
    }
}
|
三、导航栏渐变
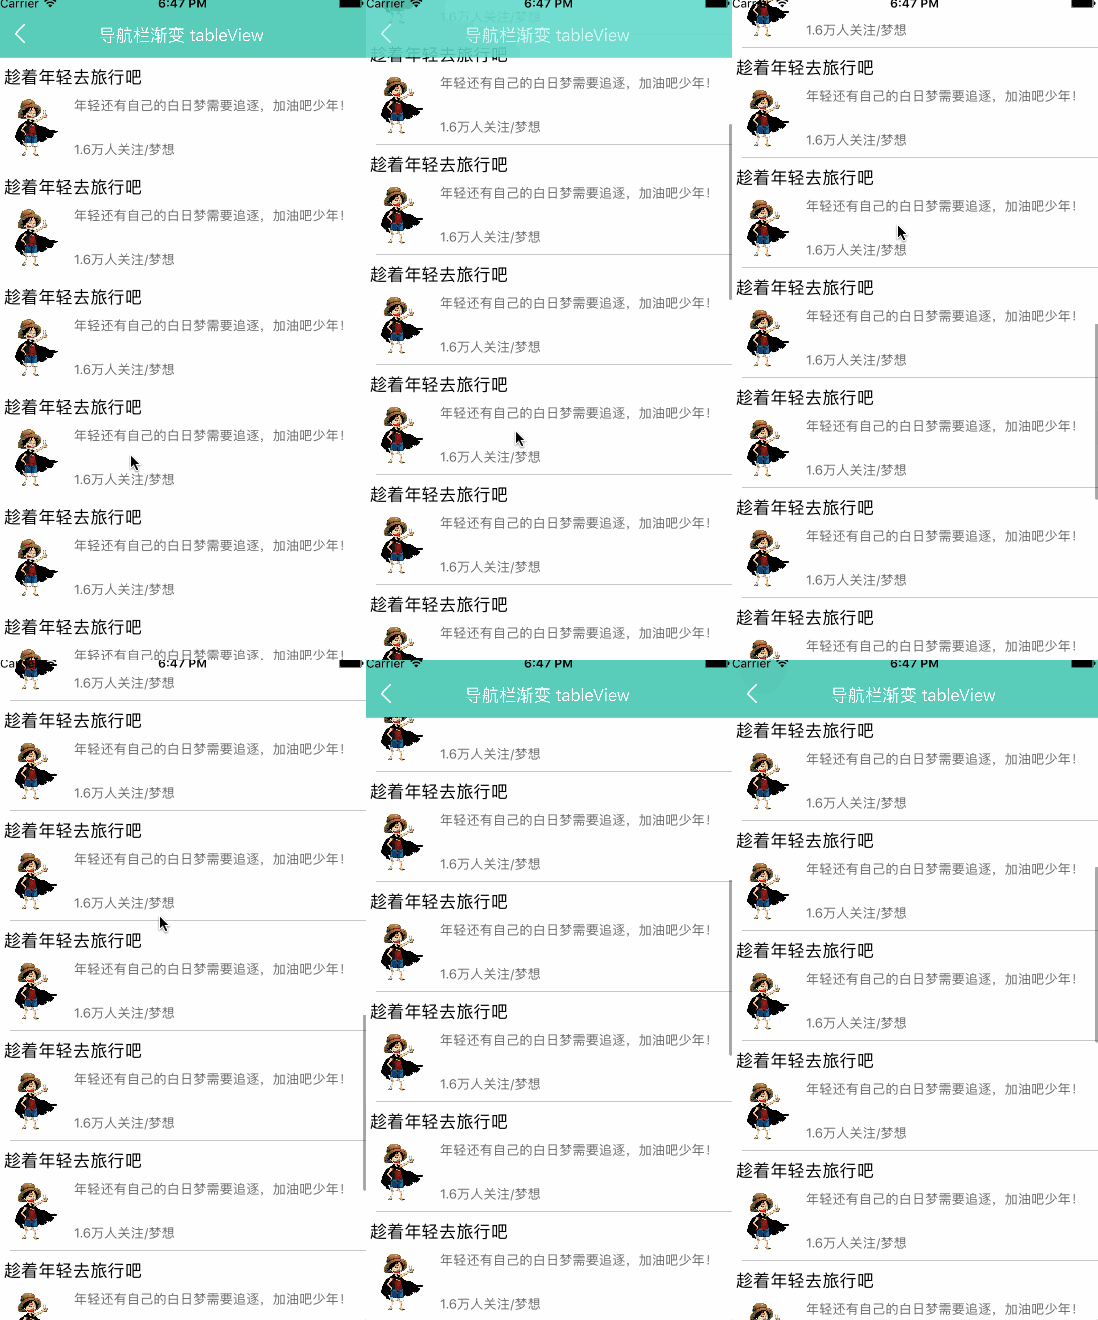
页面滚动时调用
 1
 2
 3
 4
 5
 6
 7
 8
 9
10
11
12
13
14
15
16
17
18
19
20
21
22
23
24
25
26
27
28
|
// MARK: - UIScrollViewDelegate 滚动页面时调用
extension NNItemTableViewController {
    override func scrollViewDidScroll(_ scrollView: UIScrollView) {
        if type == tableViewType.haveHeader {
            return
        }
        currentPostion = scrollView.contentOffset.y
        if currentPostion > 0 {
            if currentPostion - lastPosition >= 0 {
                if topBool {
                    topBool = false
                    bottomBool = true
                    stopPosition = currentPostion + 64
                }
                lastPosition = currentPostion
                navigationController?.navigationBar.alpha = 1 - currentPostion / 500
            } else {
                if bottomBool {
                    bottomBool = false
                    topBool = true
                    stopPosition = currentPostion + 64
                }
                lastPosition = currentPostion
                navigationController?.navigationBar.alpha = (stopPosition - currentPostion) / 200
            }
        }
    }
}
|
四、瀑布流练习
基础设置
1
2
3
4
5
6
7
8
9
|
        // 布局
        let layout = NNItemCollectionViewFlowLayout()
        // 创建collectionView
        let collectionView = UICollectionView.init(frame: view.bounds, collectionViewLayout: layout)
        view.addSubview(collectionView)
        collectionView.dataSource = self
        collectionView.delegate = self
        collectionView.backgroundColor = UIColor.white
        collectionView.register(UICollectionViewCell.self, forCellWithReuseIdentifier: NNItemCollectionViewControllerID)
|
自定义 UICollectionViewFlowLayout
 1
 2
 3
 4
 5
 6
 7
 8
 9
10
11
12
13
14
15
16
17
18
19
20
21
22
23
24
25
26
27
28
29
30
31
32
33
34
35
36
37
38
39
40
41
42
43
44
45
46
47
48
49
50
51
52
53
54
|
    // MARK: - 更新布局
    override func prepare() {
        super.prepare()
        // 清除所有的布局属性
        attrsArray.removeAll()
        columnHeightsAry.removeAll()

        for _ in 0 ..< columnCountDefault {
            columnHeightsAry.append(edgeInsetsDefault.top)
        }

        let sections : Int = (collectionView?.numberOfSections)!
        for num in 0 ..< sections {
            let count : Int = (collectionView?.numberOfItems(inSection: num))!
            for i in 0 ..< count {
                let indexpath : NSIndexPath = NSIndexPath.init(item: i, section: num)
                let attrs = layoutAttributesForItem(at: indexpath as IndexPath)!
                attrsArray.append(attrs)
            }
        }
    }

    // MARK: - cell 对应的布局属性
    override func layoutAttributesForItem(at indexPath: IndexPath) -> UICollectionViewLayoutAttributes? {

        let attrs = UICollectionViewLayoutAttributes.init(forCellWith: indexPath)
        let collectionWidth = collectionView?.frame.size.width
        // 获得所有 item 的宽度
        let itemW = (collectionWidth! - edgeInsetsDefault.left - edgeInsetsDefault.right - CGFloat(columnCountDefault-1) * columnMargin) / CGFloat(columnCountDefault)
        let itemH = 50 + arc4random_uniform(100)

        // 找出高度最短那一列
        var dextColum : Int = 0
        var minH = columnHeightsAry[0]
        for i in 1 ..< columnCountDefault{
            // 取出第 i 列的高度
            let columnH = columnHeightsAry[i]

            if minH > columnH {
                minH = columnH
                dextColum = i
            }
        }

        let x = edgeInsetsDefault.left + CGFloat(dextColum) * (itemW + columnMargin)
        var y = minH
        if y != edgeInsetsDefault.top{
            y = y + itemMargin
        }
        attrs.frame = CGRect(x: x, y: y, width: itemW, height: CGFloat(itemH))
        // 更新最短那列高度
        columnHeightsAry[dextColum] = attrs.frame.maxY
        return attrs
    }
|
 1
 2
 3
 4
 5
 6
 7
 8
 9
10
11
12
13
14
15
16
17
18
19
20
21
22
23
24
25
26
27
28
29
30
31
32
33
34
35
36
37
38
39
40
41
42
43
44
45
46
47
48
49
50
51
52
53
54
55
|
    // MARK: - 放大缩小
    // MARK: 放大
    func amplificationBtnClick() {
        var zoomScale = scrollView.zoomScale // 当前缩放
        zoomScale += 0.1
        if zoomScale >= scrollView.maximumZoomScale {
            return
        }
        self.scrollView.setZoomScale(zoomScale, animated: true)
    }

    // MARK: 缩小
    func narrowDownBtnClick() {
        var zoomScale = scrollView.zoomScale // 当前缩放
        zoomScale -= 0.1
        if zoomScale <= scrollView.minimumZoomScale {
            return
        }
        self.scrollView.setZoomScale(zoomScale, animated: true)
    }

// MARK: - NNItemBtnViewDelegate 上下左右点击代理
extension NNItemScrollView {
    // MARK: 向左
    func leftBtnClickDelegate() {
        var point = self.scrollView.contentOffset
        point.x += 100
        point.x = point.x >= self.scrollView.contentSize.width ? 0 : point.x
        scrollView.setContentOffset(point, animated: true)
    }

    // MARK: 向右
    func rightBtnClickDelegate() {
        var point = self.scrollView.contentOffset
        point.x -= 100
        point.x = point.x <= -NNScreenWidth ? 0 : point.x
        scrollView.setContentOffset(point, animated: true)
    }

    // MARK: 向上
    func topBtnClickDelegate() {
        var point = self.scrollView.contentOffset
        point.y += 50
        point.y = point.y >= self.scrollView.contentSize.height ? 0 : point.y
        scrollView.setContentOffset(point, animated: true)
    }

    // MARK: 向下
    func bottomBtnClickDelegate() {
        var point = self.scrollView.contentOffset
        point.y -= 50
        point.y = point.y <= -NNScreenHeight ? 0 : point.y
        scrollView.setContentOffset(point, animated: true)
    }
}
|
六、照相功能,更换头像(建议用真机)
 1
 2
 3
 4
 5
 6
 7
 8
 9
10
11
12
13
14
15
16
17
18
19
20
21
22
23
24
25
26
27
28
29
30
31
32
33
34
35
36
37
38
39
|
// MARK: - 点击头像按钮,更换头像
    func changePicture() {
        let alertcontroller = UIAlertController(title: "请选择相片", message: nil, preferredStyle: .actionSheet)
        let alertaction = UIAlertAction(title: "从相册选取", style: .destructive) { (action) in
            let imagePicker = UIImagePickerController()
            imagePicker.delegate = self
            imagePicker.sourceType = .photoLibrary
            imagePicker.allowsEditing = true
            self.present(imagePicker, animated: true, completion: nil)
        }

        let alertaction2 = UIAlertAction(title: "拍照", style: .destructive) { (action) in
            if (!UIImagePickerController.isSourceTypeAvailable(.camera)) {
                print("设备不支持相机")
                return
            }
            let imagePicker = UIImagePickerController()
            imagePicker.delegate = self
            imagePicker.sourceType = .camera
            imagePicker.allowsEditing = true
            self.present(imagePicker, animated: true, completion: nil)
        }

        let alertAction3 = UIAlertAction(title: "取消", style: .cancel) { (action) in
            print("取消")
        }

        alertcontroller.addAction(alertaction)
        alertcontroller.addAction(alertaction2)
        alertcontroller.addAction(alertAction3)
        present(alertcontroller, animated: true, completion: nil)
    }

    // MARK: - UIImagePickerControllerDelegate
    func imagePickerController(_ picker: UIImagePickerController, didFinishPickingMediaWithInfo info: [String : Any]) {
        let image = info[UIImagePickerControllerOriginalImage] as! UIImage
        imageView.image = image
        self.dismiss(animated: true, completion: nil)
    }
|
七、二维码扫描及识别(建议用真机)
 1
 2
 3
 4
 5
 6
 7
 8
 9
10
11
12
13
14
15
16
17
18
19
20
21
22
23
24
25
26
27
28
29
30
31
32
33
34
35
36
37
38
39
40
41
42
43
44
45
46
47
48
49
50
51
|
// MARK: - 扫描设备设置
    func setupScanSession() {
        do {
            // 设置捕捉设备
            let device = AVCaptureDevice.defaultDevice(withMediaType: AVMediaTypeVideo)
            // 设置设备输入输出
            let input = try AVCaptureDeviceInput(device: device)
            let output = AVCaptureMetadataOutput()
            output.setMetadataObjectsDelegate(self, queue: DispatchQueue.main)

            // 设置会话
            let  scanSession = AVCaptureSession()
            scanSession.canSetSessionPreset(AVCaptureSessionPresetHigh)

            if scanSession.canAddInput(input) {
                scanSession.addInput(input)
            }

            if scanSession.canAddOutput(output) {
                scanSession.addOutput(output)
            }

            // 设置扫描类型(二维码和条形码)
            output.metadataObjectTypes = [
                AVMetadataObjectTypeQRCode,
                AVMetadataObjectTypeCode39Code,
                AVMetadataObjectTypeCode128Code,
                AVMetadataObjectTypeCode39Mod43Code,
                AVMetadataObjectTypeEAN13Code,
                AVMetadataObjectTypeEAN8Code,
                AVMetadataObjectTypeCode93Code]

            // 预览图层
            let scanPreviewLayer = AVCaptureVideoPreviewLayer(session:scanSession)
            scanPreviewLayer!.videoGravity = AVLayerVideoGravityResizeAspectFill
            scanPreviewLayer!.frame = view.layer.bounds

            view.layer.insertSublayer(scanPreviewLayer!, at: 0)

            // 设置扫描区域
            NotificationCenter.default.addObserver(forName: NSNotification.Name.AVCaptureInputPortFormatDescriptionDidChange, object: nil, queue: nil, using: { (noti) in
                output.rectOfInterest = (scanPreviewLayer?.metadataOutputRectOfInterest(for:self.scanImageView.frame))!
            })
            // 保存会话
            self.scanSession = scanSession

        } catch {
            // 摄像头不可用
            return
        }
    }
|
扫描完成后调用
 1
 2
 3
 4
 5
 6
 7
 8
 9
10
11
12
13
14
15
16
|
// MARK: - AVCaptureMetadataOutputObjectsDelegate 扫描捕捉完成
extension NNScanCodeController : AVCaptureMetadataOutputObjectsDelegate {
    func captureOutput(_ captureOutput: AVCaptureOutput!, didOutputMetadataObjects metadataObjects: [Any]!, from connection: AVCaptureConnection!) {
        // 停止扫描
        scanLine.layer.removeAllAnimations()
        scanSession!.stopRunning()

        // 扫完完成
        if metadataObjects.count > 0 {
            if let resultObj = metadataObjects.first as? AVMetadataMachineReadableCodeObject {
                print(resultObj.stringValue)
                scanResult.text = "扫描结果:" + resultObj.stringValue
            }
        }
    }
}
|
识别验证码,从相册中选择
 1
 2
 3
 4
 5
 6
 7
 8
 9
10
11
12
13
14
15
16
17
18
19
20
21
22
23
24
25
26
27
|
// MARK: - UIImagePickerControllerDelegate, UINavigationControllerDelegate
extension NNScanCodeController : UIImagePickerControllerDelegate , UINavigationControllerDelegate {
    func imagePickerController(_ picker: UIImagePickerController, didFinishPickingMediaWithInfo info: [String : Any]) {

        // 判断是否能取到图片
        guard let image = info[UIImagePickerControllerOriginalImage] as? UIImage else {
            return
        }
        // 转成ciimage
        guard let ciimage = CIImage(image: image) else {
            return
        }
        // 从选中的图片中读取二维码
        // 创建探测器
        let detector = CIDetector(ofType: CIDetectorTypeQRCode, context: nil, options: [CIDetectorAccuracy : CIDetectorAccuracyLow])
        let resoult = (detector?.features(in: ciimage))!
        scanResult.text = "无法识别"
        for result in resoult {
            guard (result as! CIQRCodeFeature).messageString != nil else {
                return
            }

            scanResult.text = "扫描结果:" + (result as! CIQRCodeFeature).messageString!
        }
        picker.dismiss(animated: true, completion: nil)
    }
}
|
八、随机图片验证码封装
 1
 2
 3
 4
 5
 6
 7
 8
 9
10
11
12
13
14
15
16
17
18
19
20
21
22
23
24
25
26
27
28
29
30
31
32
33
34
35
36
37
38
39
40
41
42
43
|
    // MARK: - 绘制图形验证码
    override func draw(_ rect: CGRect) {
        if charString.isEmpty {
            return;
        }

        let textString:String = charString
        let charSize = textString.substring(to: textString.startIndex).size(attributes: [NSFontAttributeName : UIFont.systemFont(ofSize: 14)])
        let width = rect.size.width / CGFloat(charCount) - charSize.width - 15;
        let hight = rect.size.height - charSize.height;
        var point: CGPoint

        var pointX: CGFloat
        var pointY: CGFloat
        for i in 0..<textString.characters.count {
            let char = CGFloat(i)
            pointX = (CGFloat)(arc4random() % UInt32(Float(width))) + rect.size.width / (CGFloat)(textString.characters.count) * char
            pointY = (CGFloat)(arc4random() % UInt32(Float(hight)))
            point = CGPoint(x: pointX, y: pointY)
            let charStr = textString[textString.index(textString.startIndex, offsetBy:i)]
            let string = String(charStr)
            string.draw(at: point,withAttributes:([NSFontAttributeName : UIFont.systemFont(ofSize: 14)]))
        }
        drawLine(rect)
    }

    // MARK: - 绘制干扰线
    func drawLine(_ rect: CGRect) {
        let context = UIGraphicsGetCurrentContext()
        context!.setLineWidth(1.0)
        var pointX = 0.0
        var pointY = 0.0
        for _ in 0..<lineCount {
            context!.setStrokeColor(randomColor().cgColor)
            pointX = Double(arc4random() % UInt32(Float(rect.size.width)))
            pointY = Double(arc4random() % UInt32(Float(rect.size.height)))
            context?.move(to: CGPoint(x: pointX, y: pointY))
            pointX = Double(CGFloat(arc4random() % UInt32(Float(rect.size.width))))
            pointY = Double(CGFloat(arc4random() % UInt32(Float(rect.size.height))))
            context?.addLine(to: CGPoint(x: pointX, y: pointY))
            context!.strokePath()
        }
    }
|
OC版本:iOS开发 - 随机图片验证码封装
九、圆形输入框封装
 1
 2
 3
 4
 5
 6
 7
 8
 9
10
11
12
13
14
15
16
17
18
19
20
21
22
23
24
25
26
27
28
29
30
31
32
33
34
35
36
37
38
39
40
41
42
43
44
45
46
47
48
49
50
51
52
53
54
55
56
57
58
59
60
61
|
    // MARK: - 监听文本输入 核心操作
    func textFieldDidChange(_ textField: UITextField) {
        let i = textField.text?.characters.count
        if i! > labelCount {
            return
        }
        if i == 0 {
            ((labelArr.object(at: 0)) as! UILabel).text = ""
            ((labelArr.object(at: 0)) as! UILabel).layer.borderColor = defaultColor.cgColor
        } else {
            ((labelArr.object(at: (i! - 1))) as! UILabel).text = (textField.text! as NSString).substring(with: NSMakeRange(i! - 1, 1))
            ((labelArr.object(at: (i! - 1))) as! UILabel).layer.borderColor = changedColor.cgColor
            ((labelArr.object(at: (i! - 1))) as! UILabel).textColor = changedColor
            if labelCount > i! {
                ((labelArr.object(at: (i!))) as! UILabel).text = ""
                ((labelArr.object(at: (i!))) as! UILabel).layer.borderColor = defaultColor.cgColor
            }
        }
    }

    // MARK: - setupUI
    func setupUI() {
        setupTextField()
        var labelX = CGFloat()
        let labelY : CGFloat = 0.0
        let labelWidth = self.width / CGFloat(labelCount)
        let sideLength = labelWidth < self.height ? labelWidth : self.height

        for i in 0..<labelCount {
            if i == 0 {
                labelX = 0
            } else {
                labelX = CGFloat(i) * (sideLength + labelDistance)
            }
            let label = UILabel(frame: CGRect(x: labelX, y: labelY, width: sideLength, height: sideLength))
            self.addSubview(label)
            label.textAlignment = NSTextAlignment.center
            label.layer.borderColor = UIColor.black.cgColor
            label.layer.borderWidth = 1.0
            label.layer.cornerRadius = sideLength / 2.0
            labelArr.add(label)
        }
    }

    // MARK: - UITextFieldDelegate
    // MARK: 监听输入框
    func textField(_ textField: UITextField, shouldChangeCharactersIn range: NSRange, replacementString string: String) -> Bool {
        // 允许删除
        if (string.characters.count == 0) {
            return true
        } else if (textField.text?.characters.count)! >= labelCount {
            return false
        } else {
            return true
        }
    }
    // MARK: 回车收起键盘
    func textFieldShouldReturn(_ textField: UITextField) -> Bool {
        textField.resignFirstResponder()
        return false
    }
|
OC版本:iOS开发 - 圆形验证码(或密码)输入框的封装
十、第三方库 SnapKit 用法
 1
 2
 3
 4
 5
 6
 7
 8
 9
10
11
12
13
14
15
16
17
18
19
20
21
22
23
24
25
26
27
28
29
30
31
32
33
34
35
36
37
38
39
40
41
42
43
44
45
46
47
48
49
50
51
52
53
54
55
56
57
58
59
60
61
62
63
64
65
66
67
68
69
70
71
72
73
74
75
76
77
78
|
    func addRedView() {
        redView.backgroundColor = UIColor.red
        view.addSubview(redView)

        // redView 距离父视图四条边的距离都是 50
        redView.snp.makeConstraints { (make) in
            make.edges.equalTo(view).inset(50)
        }
    }

    func addBlueView() {
        blueView.backgroundColor = UIColor.blue
        view.addSubview(blueView)

        // blueView 左边距离父视图为 0;上边距离父视图为 0;size 是(50,50)
        blueView.snp.makeConstraints { (make) in
            make.left.equalTo(0)
            make.top.equalTo(0)
            make.size.equalTo(CGSize(width: 50, height: 50))
        }
    }

    func addBlackView() {
        blackView.backgroundColor = UIColor.black
        view.addSubview(blackView)

        // blackView 左边和 redView 的右边距离为 0;大小与 blueView 相同;且与 blueView 上对齐
        blackView.snp.makeConstraints { (make) in
            make.left.equalTo(redView.snp.right)
            make.size.equalTo(blueView)
            make.top.equalTo(blueView)
        }
    }

    func addCyanView() {
        cyanView.backgroundColor = UIColor.cyan
        view.addSubview(cyanView)

        // cyanView 与 blueView 左对齐;cyanView 的顶部距离 redView 的底部 10;cyanView 的高是40;cyanView 与 blueView 等宽
        cyanView.snp.makeConstraints { (make) in
            make.trailing.equalTo(blueView)
            make.top.equalTo(redView.snp.bottom).offset(10)
            make.height.equalTo(40)
            make.width.equalTo(blueView)
        }
    }

    func addYellowView() {
        yellowView.backgroundColor = UIColor.yellow
        view.addSubview(yellowView)

        // yellowView 顶部与 redView 的底部对齐;yellowView 与 blackView 左对齐;yellowView 与 blueView 相同大小
        yellowView.snp.makeConstraints { (make) in
            make.top.equalTo(redView.snp.bottom)
            make.trailing.equalTo(blackView)
            make.size.equalTo(blueView)
        }
    }

    func addWhiteView() {
        whiteView.backgroundColor = UIColor.white
        redView.addSubview(whiteView)

        // whiteView 的父视图是 redView,距离父视图四条边的距离分别是(30,10,30,10)

        whiteView.snp.makeConstraints { (make) in
            // 第一种方式
            make.edges.equalTo(redView).inset(UIEdgeInsets(top: 30, left: 10, bottom: 30, right: 10))
            // 第二种方式
//            make.top.equalTo(redView).offset(30)
//            make.left.equalTo(redView).offset(10)
//            make.bottom.equalTo(redView).offset(-30)
//            make.right.equalTo(redView).offset(-10)
            // 第三种方式
//            make.top.left.bottom.right.equalTo(redView).inset(UIEdgeInsets(top: 30, left: 10, bottom: 30, right: 10))
        }
    }
|


