MBProgressHUD 是一个为 APP 添加 HUD 窗口的第三方框架,使用起来极其简单方便,关于 MBProgressHUD 的使用方法,GitHub 上有详细的说明,这里就不多加介绍了,本文主要是从源码的角度分析 MBProgressHUD的具体实现。
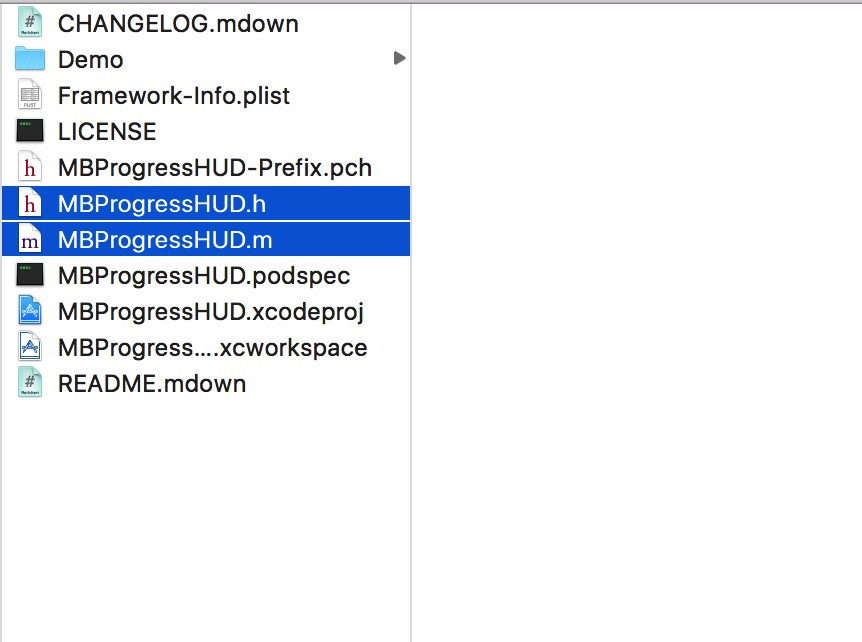
- 先来对 MBProgressHUD 有个大体的认识,这是刚从
GitHub 上拉下来的代码,如下图,MBProgressHUD 的主要文件只有两个:
下面我们就开始分析 MBProgressHUD 的具体实现。在此之前先了解下文章的目录,本文主要有三个部分:
- MBProgressHUD 核心 API
- 这一部分讲的主要是 MBProgressHUD 的一些属性方法等,主要是为了对 MBProgressHUD 先有个大概的认识
- show 系列方法
- 这一部分主要是展示 HUD 窗口时调用的方法及代码分析
- hide 系列方法
- 这一部分主要是隐藏 HUD 窗口时调用的方法及代码分析
一、MBProgressHUD 核心 API
这一部分讲的主要是 MBProgressHUD 的一些属性方法等,主要是为了对 MBProgressHUD 先有个大概的认识
1.1 模式
首先来看看 MBProgressHUD 中定义的枚举,mode 一共有六种显示样式:
 1
 2
 3
 4
 5
 6
 7
 8
 9
10
11
12
13
14
15
|
/// 显示样式
typedef NS_ENUM(NSInteger, MBProgressHUDMode) {
    /// 默认模式, 系统自带的指示器
    MBProgressHUDModeIndeterminate,
    /// 圆形饼图
    MBProgressHUDModeDeterminate,
    /// 水平进度条
    MBProgressHUDModeDeterminateHorizontalBar,
    /// 圆环
    MBProgressHUDModeAnnularDeterminate,
    /// 自定义视图
    MBProgressHUDModeCustomView,
    /// 只显示文字
    MBProgressHUDModeText
};
|
简单的效果图如下(颜色尺寸等都可以优化,我这里只是简单地示例):


1.2 动画效果
MBProgressHUD 在显示 HUD 窗口的时候,一般都伴随着动画效果,MBProgressHUD 中的动画效果也是一个枚举,如下:
 1
 2
 3
 4
 5
 6
 7
 8
 9
10
|
typedef NS_ENUM(NSInteger, MBProgressHUDAnimation) {
    ///  默认效果,只有透明度变化
    MBProgressHUDAnimationFade,
    /// 透明度变化 + 形变 (放大时出现缩小消失)
    MBProgressHUDAnimationZoom,
    /// 透明度变化 + 形变 (缩小)
    MBProgressHUDAnimationZoomOut,
    /// 透明度变化 + 形变 (放大)
    MBProgressHUDAnimationZoomIn
};
|
这里先简单的罗列出来,下文中还会多次用到。
1.3 MBProgressHUD 组成
MBProgressHUD 主要由四部分组成:loading 动画视图、标题文本框、详情文本框、HUD 背景框,如下图。

之前用 MBProgressHUD 设置标题文本详情文本是通过几个属性来实现的,功能少也较为繁琐,因此被遗弃了;现在设置标题文本详情文本等十分简便,直接通过 label 等控件就可以实现,而且在功能上也有很大的扩展,详情请看下面这个代码块:
 1
 2
 3
 4
 5
 6
 7
 8
 9
10
11
12
|
/// bezelView 是指包括文本和指示器的视图,和自定义的 customView 类似
@property (strong, nonatomic, readonly) MBBackgroundView *bezelView;
/// backgroundView 背景视图
@property (strong, nonatomic, readonly) MBBackgroundView *backgroundView;
/// customView 自定义视图
@property (strong, nonatomic, nullable) UIView *customView;
/// label 指的是标题文本
@property (strong, nonatomic, readonly) UILabel *label;
/// detailsLabel指的是详情文本
@property (strong, nonatomic, readonly) UILabel *detailsLabel;
/// hud 窗口还可以加入button,添加事件
@property (strong, nonatomic, readonly) UIButton *button;
|
另外这里再附加两张 MBProgressHUD 的整体布局图,以便更好地认识 MBProgressHUD。

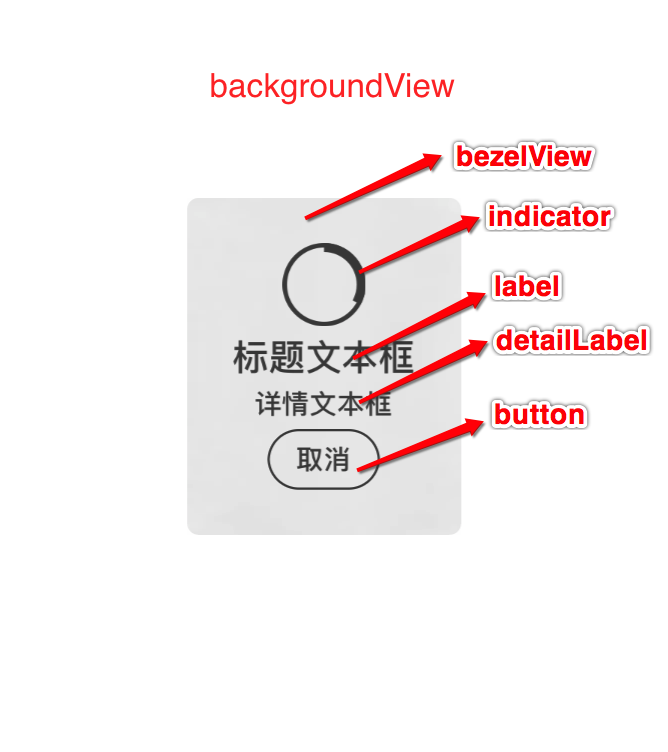
简单介绍:
- backgroundView:整个背景图层,可以通过 MBBackgroundView 的 style 属性设置
- bezelView:提供元素 (indicator、label、detailLabel、button)的背景
- indicator:指示器显示进度情况 这个视图由我们设定的mode属性决定
- label:显示标题文本
- detailLabel:显示详情文本
- button:添加点击事件
1.4 MBProgressHUD 中的属性
MBProgressHUD 文件中主要包括四个类,它们分别是 MBProgressHUD、MBRoundProgressView、 MBBarProgressView、 MBBackgroundView。这四个类各有各的用法,比如如果是进度条模式(MBProgressHUDModeDeterminateHorizontalBar),则使用的是 MBBarProgressView 类;如果是饼图模式(MBProgressHUDModeDeterminate)或环形模式(MBProgressHUDModeAnnularDeterminate),则使用的是 MBRoundProgressView 类。下面是这四个类的相关属性。
1.41 MBProgressHUD 相关属性
 1
 2
 3
 4
 5
 6
 7
 8
 9
10
11
12
13
14
15
16
17
18
19
20
21
22
23
24
25
26
27
28
29
30
31
32
33
34
35
36
37
38
39
40
41
42
43
44
45
46
47
|
/// show 方法触发到显示 HUD 窗口的间隔时间,默认是 0
@property (assign, nonatomic) NSTimeInterval graceTime;

/// HUD 窗口显示的最短时间,默认是 0
@property (assign, nonatomic) NSTimeInterval minShowTime;

/// HUD 窗口显示模式, 默认是系统自带的指示器
@property (assign, nonatomic) MBProgressHUDMode mode;

/// 进度条指示器以及文本的颜色
@property (strong, nonatomic, nullable) UIColor *contentColor UI_APPEARANCE_SELECTOR;

/// HUD 窗口显示和隐藏的动画类型MBProgressHUD
@property (assign, nonatomic) MBProgressHUDAnimation animationType UI_APPEARANCE_SELECTOR;

/// HUD 窗口位置设置,比如 hud.offset = CGPointMake(0.f, MBProgressMaxOffset),可以移到底部中心位置
@property (assign, nonatomic) CGPoint offset UI_APPEARANCE_SELECTOR;

/// HUD 元素到 HUD 边缘的距离,默认是 20.f
@property (assign, nonatomic) CGFloat margin UI_APPEARANCE_SELECTOR;

/// HUD 窗口背景框的最小尺寸
@property (assign, nonatomic) CGSize minSize UI_APPEARANCE_SELECTOR;

/// 是否强制 HUD 背景框宽高相等
@property (assign, nonatomic, getter = isSquare) BOOL square UI_APPEARANCE_SELECTOR;

/// 进度条 (0.0 到 1.0)
@property (nonatomic, assign) float progress;

/// bezelView 是指包括文本和指示器的视图,和自定义的 customView 类似
@property (strong, nonatomic, readonly) MBBackgroundView *bezelView;

/// backgroundView 背景视图
@property (strong, nonatomic, readonly) MBBackgroundView *backgroundView;

/// customView 自定义视图
@property (strong, nonatomic, nullable) UIView *customView;

/// label 指的是标题文本
@property (strong, nonatomic, readonly) UILabel *label;

/// detailsLabel指的是详情文本
@property (strong, nonatomic, readonly) UILabel *detailsLabel;

/// hud 窗口还可以加入button,添加事件
@property (strong, nonatomic, readonly) UIButton *button;
|
1.42 MBRoundProgressView 相关属性
 1
 2
 3
 4
 5
 6
 7
 8
 9
10
11
12
13
14
|
/// 进度条 (0.0 到 1.0)
@property (nonatomic, assign) float progress;

/// 进度条颜色
@property (nonatomic, strong) UIColor *progressColor;

/// 进度条指示器的颜色
@property (nonatomic, strong) UIColor *progressTintColor;

/// 进度条指示器的背景颜色,只适用在 iOS7 以上,默认为半透明的白色 (透明度 0.1)
@property (nonatomic, strong) UIColor *backgroundTintColor;

/// 显示模式,NO = 圆形;YES = 环形。默认是 NO
@property (nonatomic, assign, getter = isAnnular) BOOL annular;
|
1.43 MBBarProgressView 相关属性
 1
 2
 3
 4
 5
 6
 7
 8
 9
10
11
|
/// 进度条 (0.0 到 1.0)
@property (nonatomic, assign) float progress;

/// 进度条边界线的颜色,默认是白色
@property (nonatomic, strong) UIColor *lineColor;

/// 进度条背景色,默认是透明
@property (nonatomic, strong) UIColor *progressRemainingColor;

/// 进度条颜色
@property (nonatomic, strong) UIColor *progressColor;
|
1.44 MBBackgroundView 相关属性
1
2
3
4
5
|
/// 背景图层样式,有两种,iOS7 或者以上版本默认风格是MBProgressHUDBackgroundStyleBlur,其他为MBProgressHUDBackgroundStyleSolidColor,由于 iOS7 不支持 UIVisualEffectView,所以在 iOS7 和更高版本中会有所不同
@property (nonatomic) MBProgressHUDBackgroundStyle style;

/// 背景颜色,由于 iOS7 不支持 UIVisualEffectView,所以在 iOS7 和更高版本中会有所不同
@property (nonatomic, strong) UIColor *color;
|
1.5 MBProgressHUD 中的一些方法
1.51 类方法
1
2
3
4
5
6
7
8
|
/// 创建一个 HUD 窗口,并把它显示在 view 上,还可以设置是否有动画
+ (instancetype)showHUDAddedTo:(UIView *)view animated:(BOOL)animated;

/// 找到最上层的 HUD subview 并把它隐藏,成功为YES、其他情况为 NO
+ (BOOL)hideHUDForView:(UIView *)view animated:(BOOL)animated;

/// 返回最上层的 HUD subview
+ (nullable MBProgressHUD *)HUDForView:(UIView *)view;
|
这三个类方法中,常用的是第一个函数+ (instancetype)showHUDAddedTo:(UIView *)view animated:(BOOL)animated;直接创建 HUD,并把它显示在 view 上,用起来极其方便
1.52 对象方法
 1
 2
 3
 4
 5
 6
 7
 8
 9
10
11
|
/// 以view为基准创建初始化一个HUD对象,为HUD的初始化构造函数
- (instancetype)initWithView:(UIView *)view;

/// 显示HUD控件,此函数应该在主线程中调用
- (void)showAnimated:(BOOL)animated;

/// 隐藏HUD控件,animated控制是否显示动画。对应于- (void)showAnimated:(BOOL)animated;
- (void)hideAnimated:(BOOL)animated;

/// 在delay时间之后隐藏HUD,animated控制显示动画与否,delay控制延迟时间
- (void)hideAnimated:(BOOL)animated afterDelay:(NSTimeInterval)delay;
|
这几个对象方法中,常用的也有两个- (void)hideAnimated:(BOOL)animated;和- (void)hideAnimated:(BOOL)animated afterDelay:(NSTimeInterval)delay;
二、show 系列方法
这一部分主要是展示 HUD 窗口时调用的方法及代码分析
下面这个方法在我们创建 MBProgressHUD 对象时首先调用
 1
 2
 3
 4
 5
 6
 7
 8
 9
10
11
12
13
|
+ (instancetype)showHUDAddedTo:(UIView *)view animated:(BOOL)animated {

	/// 创建并初始化 MBProgressHUD 对象,根据传进来的 view 来设定
    MBProgressHUD *hud = [[self alloc] initWithView:view];

    /// 移除 HUD 窗口
    hud.removeFromSuperViewOnHide = YES;

    /// 添加到 View 上,并显示
    [view addSubview:hud];
    [hud showAnimated:animated];
    return hud;
}
|
这个方法会调用两个主要方法:- (id)initWithView:(UIView *)view 和 - (void)showAnimated:(BOOL)animated,具体的调用流程如下图:
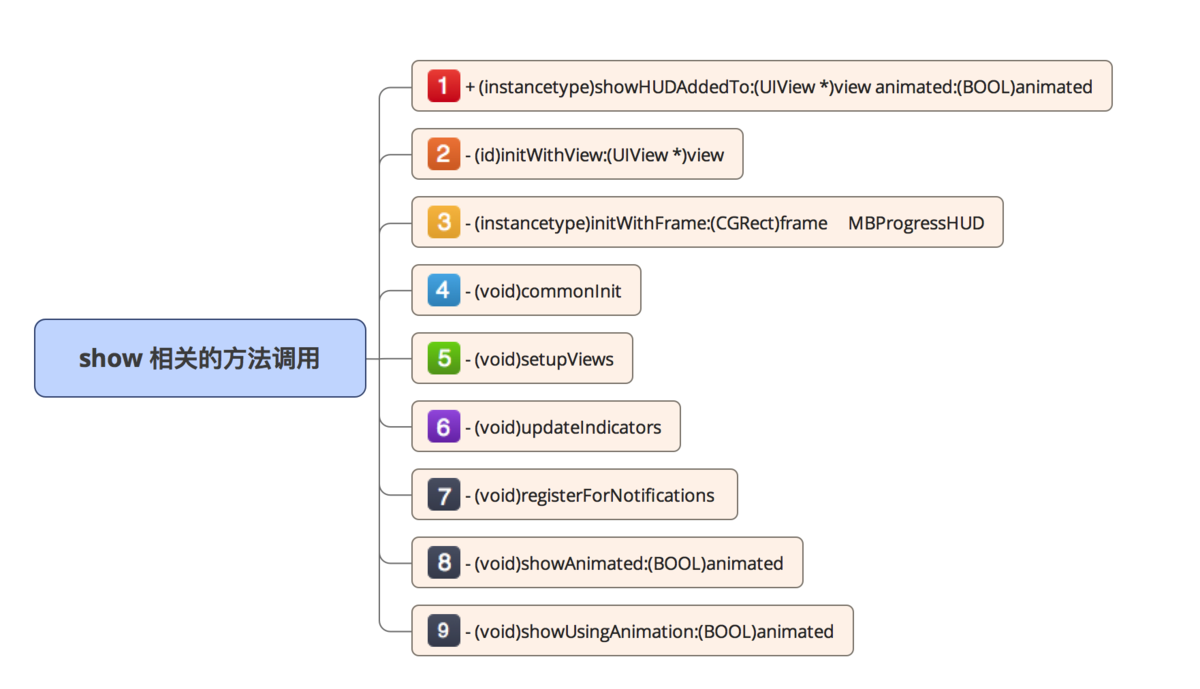
当然在 MBProgressHUD 中,+ (instancetype)showHUDAddedTo:(UIView *)view animated:(BOOL)animated 调用的方法远不止上图列的这些,图上列的只是几个主要方法。接下来我们就根据程序的执行过程来一步一步分析一下代码。
在方法 - (id)initWithView:(UIView *)view中,调用 - (instancetype)initWithFrame:(CGRect)frame,接着会调用- (void)commonInit。
 1
 2
 3
 4
 5
 6
 7
 8
 9
10
11
12
13
14
15
16
17
18
19
20
21
22
23
24
25
26
27
28
29
30
31
32
33
34
35
36
37
38
39
40
41
42
43
44
45
46
47
48
49
50
51
52
53
54
55
56
57
58
|
- (id)initWithView:(UIView *)view {
    NSAssert(view, @"View must not be nil.");
    return [self initWithFrame:view.bounds];
}

- (instancetype)initWithFrame:(CGRect)frame {
    if ((self = [super initWithFrame:frame])) {
        [self commonInit];
    }
    return self;
}

- (instancetype)initWithCoder:(NSCoder *)aDecoder {
    if ((self = [super initWithCoder:aDecoder])) {
        [self commonInit];
    }
    return self;
}

- (void)commonInit {

    /// 默认效果, 透明度变化
    _animationType = MBProgressHUDAnimationFade;

    /// 默认模式, 系统自带的指示器
    _mode = MBProgressHUDModeIndeterminate;

    /// HUD 元素到 HUD 边缘的距离,默认是 20.f
    _margin = 20.0f;
    _opacity = 1.f;
    _defaultMotionEffectsEnabled = YES;

    // 默认颜色,根据当前的 iOS 版本
    BOOL isLegacy = kCFCoreFoundationVersionNumber < kCFCoreFoundationVersionNumber_iOS_7_0;

    /// 进度条指示器以及文本的颜色
    _contentColor = isLegacy ? [UIColor whiteColor] : [UIColor colorWithWhite:0.f alpha:0.7f];

	/// opaque 类似 Alpha,表示当前 UIView 的不透明度,设置是否之后对于 UIView 的显示并没有什么影响,官方文档的意思是 opaque 默认为 YES,如果 alpha 小于 1,那么应该设置 opaque 设置为 NO,当 alpha 为 1,opaque设置为 NO
    self.opaque = NO;

    /// 背景色
    self.backgroundColor = [UIColor clearColor];

    // 透明度为 0
    self.alpha = 0.0f;
    /// 自动调整子控件与父控件之间的宽高
    self.autoresizingMask = UIViewAutoresizingFlexibleWidth | UIViewAutoresizingFlexibleHeight;
    self.layer.allowsGroupOpacity = NO;

	/// 设置所需的子view
    [self setupViews];
    /// 设置指示器样式
    [self updateIndicators];
    /// 注册通知
    [self registerForNotifications];
}
|
上面代码块中的代码已经加过注释,因此在这里不再累述某句代码有什么作用,这里直接说程序的执行流程。当程序执行到 - (void)commonInit 这个方法时,会相继执行- (void)setupViews,- (void)updateIndicators,- (void)registerForNotifications 这三个方法,当然在执行这三个方法期间,也会执行其它的方法,比如会执行- (void)updateForBackgroundStyle 和- (void)updateBezelMotionEffects等等,这和你设置的 mode 的模式,以及和 label,detailsLabel ,button 这一系列元素,以及和相应的属性都有一定的关系。
接着我们来分析一下 - (void)setupViews,- (void)updateIndicators,- (void)registerForNotifications 这三个方法。
  1
  2
  3
  4
  5
  6
  7
  8
  9
 10
 11
 12
 13
 14
 15
 16
 17
 18
 19
 20
 21
 22
 23
 24
 25
 26
 27
 28
 29
 30
 31
 32
 33
 34
 35
 36
 37
 38
 39
 40
 41
 42
 43
 44
 45
 46
 47
 48
 49
 50
 51
 52
 53
 54
 55
 56
 57
 58
 59
 60
 61
 62
 63
 64
 65
 66
 67
 68
 69
 70
 71
 72
 73
 74
 75
 76
 77
 78
 79
 80
 81
 82
 83
 84
 85
 86
 87
 88
 89
 90
 91
 92
 93
 94
 95
 96
 97
 98
 99
100
101
102
103
104
105
106
107
108
109
110
111
112
113
114
115
116
117
118
119
120
121
122
123
124
125
126
127
128
129
130
131
132
133
134
135
136
137
138
139
140
141
142
143
144
145
146
147
148
149
150
151
152
153
154
155
156
157
158
159
160
161
162
163
164
165
166
167
168
169
170
171
172
173
174
175
176
177
178
179
180
181
182
183
|
- (void)setupViews {

	/// 进度条指示器以及文本的颜色
    UIColor *defaultColor = self.contentColor;


	/// 创建背景视图
    MBBackgroundView *backgroundView = [[MBBackgroundView alloc] initWithFrame:self.bounds];

    /// 背景图层样式
    backgroundView.style = MBProgressHUDBackgroundStyleSolidColor;
    backgroundView.backgroundColor = [UIColor clearColor];

    /// 自动调整 view 的宽度和高度
    backgroundView.autoresizingMask = UIViewAutoresizingFlexibleWidth | UIViewAutoresizingFlexibleHeight;
    backgroundView.alpha = 0.f;
    [self addSubview:backgroundView];
    _backgroundView = backgroundView;

	/// 创建背景视图(和上面那个大小不同)
    MBBackgroundView *bezelView = [MBBackgroundView new];

    /// 代码层面使用 Autolayout,需要对使用的 View 的translatesAutoresizingMaskIntoConstraints 属性设置为NO
    bezelView.translatesAutoresizingMaskIntoConstraints = NO;
    bezelView.layer.cornerRadius = 5.f;
    bezelView.alpha = 0.f;
    [self addSubview:bezelView];
    _bezelView = bezelView;

    /// 调用 updateBezelMotionEffects 方法,设置视差效果
    [self updateBezelMotionEffects];


	/// 创建 label 标签,显示主要文本
    UILabel *label = [UILabel new];

    /// 取消文字大小自适应
    label.adjustsFontSizeToFitWidth = NO;
    label.textAlignment = NSTextAlignmentCenter;
    label.textColor = defaultColor;
    label.font = [UIFont boldSystemFontOfSize:MBDefaultLabelFontSize];

    /// opaque 类似 Alpha,表示当前 UIView 的不透明度,设置是否之后对于 UIView 的显示并没有什么影响,官方文档的意思是 opaque 默认为 YES,如果 alpha 小于 1,那么应该设置 opaque 设置为 NO,当 alpha 为 1,opaque设置为 NO
    label.opaque = NO;
    label.backgroundColor = [UIColor clearColor];
    _label = label;


	/// 创建 detailsLabel 标签,显示详细信息

    UILabel *detailsLabel = [UILabel new];
    /// 取消文字大小自适应
    detailsLabel.adjustsFontSizeToFitWidth = NO;
    detailsLabel.textAlignment = NSTextAlignmentCenter;
    detailsLabel.textColor = defaultColor;
    detailsLabel.numberOfLines = 0;
    detailsLabel.font = [UIFont boldSystemFontOfSize:MBDefaultDetailsLabelFontSize];

    /// opaque 类似 Alpha,表示当前 UIView 的不透明度,设置是否之后对于 UIView 的显示并没有什么影响,官方文档的意思是 opaque 默认为 YES,如果 alpha 小于 1,那么应该设置 opaque 设置为 NO,当 alpha 为 1,opaque设置为 NO
    detailsLabel.opaque = NO;
    detailsLabel.backgroundColor = [UIColor clearColor];
    _detailsLabel = detailsLabel;


	/// 创建 button 按钮,并添加响应按钮
    UIButton *button = [MBProgressHUDRoundedButton buttonWithType:UIButtonTypeCustom];
    button.titleLabel.textAlignment = NSTextAlignmentCenter;
    button.titleLabel.font = [UIFont boldSystemFontOfSize:MBDefaultDetailsLabelFontSize];
    [button setTitleColor:defaultColor forState:UIControlStateNormal];
    _button = button;


	/// 将 label,detailLabel,button 添加到蒙版视图
    for (UIView *view in @[label, detailsLabel, button]) {

    	/// 代码层面使用 Autolayout,需要对使用的 View 的translatesAutoresizingMaskIntoConstraints 属性设置为NO
        view.translatesAutoresizingMaskIntoConstraints = NO;

        /// 为视图设置水平方向上优先级为 998 的压缩阻力
        [view setContentCompressionResistancePriority:998.f forAxis:UILayoutConstraintAxisHorizontal];

        /// 为视图设置垂直方向上优先级为 998 的压缩阻力
        [view setContentCompressionResistancePriority:998.f forAxis:UILayoutConstraintAxisVertical];
        [bezelView addSubview:view];
    }


	/// 创建顶部视图
    UIView *topSpacer = [UIView new];

    /// 代码层面使用 Autolayout,需要对使用的 View 的translatesAutoresizingMaskIntoConstraints 属性设置为NO
    topSpacer.translatesAutoresizingMaskIntoConstraints = NO;
    topSpacer.hidden = YES;
    [bezelView addSubview:topSpacer];
    _topSpacer = topSpacer;

	/// 创建底部视图
    UIView *bottomSpacer = [UIView new];

        /// 代码层面使用 Autolayout,需要对使用的 View 的translatesAutoresizingMaskIntoConstraints 属性设置为NO
    bottomSpacer.translatesAutoresizingMaskIntoConstraints = NO;
    bottomSpacer.hidden = YES;
    [bezelView addSubview:bottomSpacer];
    _bottomSpacer = bottomSpacer;
}

- (void)updateIndicators {
    UIView *indicator = self.indicator;

    /// 判断当前指示器是否是 UIActivityIndicatorView
    BOOL isActivityIndicator = [indicator isKindOfClass:[UIActivityIndicatorView class]];

    /// 判断当前指示器是否是 MBRoundProgressView
    BOOL isRoundIndicator = [indicator isKindOfClass:[MBRoundProgressView class]];

    MBProgressHUDMode mode = self.mode;
    /// MBProgressHUDModeIndeterminate:系统自带的指示器
    if (mode == MBProgressHUDModeIndeterminate) {
        if (!isActivityIndicator) {
             // 如果当前指示器不属于 UIActivityIndicatorView 类型,则移除之前的indicator,重新创建
            [indicator removeFromSuperview];
            indicator = [[UIActivityIndicatorView alloc] initWithActivityIndicatorStyle:UIActivityIndicatorViewStyleWhiteLarge];
            [(UIActivityIndicatorView *)indicator startAnimating];
            [self.bezelView addSubview:indicator];
        }
    }
    else if (mode == MBProgressHUDModeDeterminateHorizontalBar) {
        /// 如果当前指示器不属于 MBBarProgressView 类型,则移除之前的indicator,重新创建
        [indicator removeFromSuperview];
        indicator = [[MBBarProgressView alloc] init];
        [self.bezelView addSubview:indicator];
    }
    else if (mode == MBProgressHUDModeDeterminate || mode == MBProgressHUDModeAnnularDeterminate) {
        if (!isRoundIndicator) {
            /// 如果当前指示器不属于 MBRoundProgressView 类型,则移除之前的indicator,重新创建
            [indicator removeFromSuperview];
            indicator = [[MBRoundProgressView alloc] init];
            [self.bezelView addSubview:indicator];
        }
        if (mode == MBProgressHUDModeAnnularDeterminate) { /// 圆环指示器
            [(MBRoundProgressView *)indicator setAnnular:YES];
        }
    }
    else if (mode == MBProgressHUDModeCustomView && self.customView != indicator) { /// 自定义视图指示器
        [indicator removeFromSuperview];
        indicator = self.customView;
        [self.bezelView addSubview:indicator];
    }
    else if (mode == MBProgressHUDModeText) { /// 文本形式,去除指示器视图
        [indicator removeFromSuperview];
        indicator = nil;
    }
        /// 代码层面使用 Autolayout,需要对使用的 View 的translatesAutoresizingMaskIntoConstraints 属性设置为NO
    indicator.translatesAutoresizingMaskIntoConstraints = NO;
    self.indicator = indicator;

    if ([indicator respondsToSelector:@selector(setProgress:)]) {
    	/// 设置进度条的数值
        [(id)indicator setValue:@(self.progress) forKey:@"progress"];
    }


	 /// 为视图设置水平方向上优先级为 998 的压缩阻力
    [indicator setContentCompressionResistancePriority:998.f forAxis:UILayoutConstraintAxisHorizontal];

    /// 为视图设置垂直方向上优先级为 998 的压缩阻力
    [indicator setContentCompressionResistancePriority:998.f forAxis:UILayoutConstraintAxisVertical];

	/// 设置控件颜色
    [self updateViewsForColor:self.contentColor];
    /// 更新布局
    [self setNeedsUpdateConstraints];
}

- (void)registerForNotifications {
#if !TARGET_OS_TV
    NSNotificationCenter *nc = [NSNotificationCenter defaultCenter];
	/// 通过通知 UIApplicationDidChangeStatusBarOrientationNotification 来处理屏幕转屏事件
    [nc addObserver:self selector:@selector(statusBarOrientationDidChange:)
               name:UIApplicationDidChangeStatusBarOrientationNotification object:nil];
#endif
}
|
- 由上面代码我们可以看出,在方法
- (void)setupViews中,创建了 backgroundView、bezelView、label、detailsLabel、button 这几个控件,并使用 for 循环把 label、detailsLabel、button 添加到bezelView 视图中,最后还创建了顶部视图和底部视图,不过默认是隐藏的。有一点值得说明,在创建 button 时并没有设置 button 的 size 等属性,那么这个按钮是不会显示的。在这里 MBProgressHUD 重写了一个 Unbutton 的子类 MBProgressHUDRoundedButton。这个子类里面有一个方法,- (CGSize)intrinsicContentSize,通过这个方法来设置 Unbutton 的 size。
1
2
3
4
5
6
7
8
|
- (CGSize)intrinsicContentSize {
    /// 只有当有事件才显示(这里也告诉我们,如果这个 button 没有任何事件的话,它的大小就是 CGSizeZero,即不会显示)
    if (self.allControlEvents == 0) return CGSizeZero;
    CGSize size = [super intrinsicContentSize];
    // Add some side padding
    size.width += 20.f;
    return size;
}
|
-
- (void)updateIndicators这个方法主要是用来设置 indicator 指示器的,根据 mode 的属性显示不同的形式,具体可以参看代码注释。这个方法最后调用的是setNeedsUpdateConstraints函数,这个函数是系统自带的方法,它会自动调用- (void)updateConstraints 方法,- (void)updateConstraints 主要作用是更新各个控件的布局,我们稍后再对这个方法进行详细分析。
-
- (void)registerForNotifications这个方法中的代码量很少,它的作用是通过通知 UIApplicationDidChangeStatusBarOrientationNotification 来处理屏幕转屏事件
当- (void)registerForNotifications这一系列方法执行完毕之后,程序会重新返回到+ (instancetype)showHUDAddedTo:(UIView *)view animated:(BOOL)animated这个方法中,接着调用另一个主要函数- (void)showAnimated:(BOOL)animated。
 1
 2
 3
 4
 5
 6
 7
 8
 9
10
11
12
13
14
15
16
17
18
19
20
21
22
23
24
25
26
27
28
29
30
31
32
33
34
35
36
37
38
39
40
41
42
43
44
45
46
47
48
49
50
51
52
53
54
55
56
57
58
59
|
- (void)showAnimated:(BOOL)animated {

	/// 显示放在主线程中
    MBMainThreadAssert();

    /// 取消定时器
    [self.minShowTimer invalidate];
    self.useAnimation = animated;
    self.finished = NO;

    /// 如果设置了宽限时间graceTime,则延迟显示(避免 HUD 一闪而过的差体验)
    if (self.graceTime > 0.0) {

    	/// 创建定时器,把它加入 NSRunLoop 中
        NSTimer *timer = [NSTimer timerWithTimeInterval:self.graceTime target:self selector:@selector(handleGraceTimer:) userInfo:nil repeats:NO];
        [[NSRunLoop currentRunLoop] addTimer:timer forMode:NSRunLoopCommonModes];
        self.graceTimer = timer;
    }

    /// 没有设置 graceTime,则直接显示
    else {
        [self showUsingAnimation:self.useAnimation];
    }
}

/// 设置宽限时间 graceTime时调用的方法
- (void)handleGraceTimer:(NSTimer *)theTimer {
    // Show the HUD only if the task is still running
    if (!self.hasFinished) {
        [self showUsingAnimation:self.useAnimation];
    }
}

- (void)showUsingAnimation:(BOOL)animated {
    /// 移除所有动画
    [self.bezelView.layer removeAllAnimations];
    [self.backgroundView.layer removeAllAnimations];

    /// 取消 hideDelayTimer
    [self.hideDelayTimer invalidate];

    /// 开始时间
    self.showStarted = [NSDate date];
    self.alpha = 1.f;

    /// 以防我们隐藏 NSProgress 对象
    [self setNSProgressDisplayLinkEnabled:YES];

    if (animated) {
        [self animateIn:YES withType:self.animationType completion:NULL];
    } else {
        /// 方法弃用告警
#pragma clang diagnostic push
#pragma clang diagnostic ignored "-Wdeprecated-declarations"
        self.bezelView.alpha = self.opacity;
#pragma clang diagnostic pop
        self.backgroundView.alpha = 1.f;
    }
}
|
由上面这段代码我们可以看出,在方法- (void)showAnimated:(BOOL)animated中,无论我们有没有设置graceTime这个属性,最后都会去执行一个方法 - (void)showUsingAnimation:(BOOL)animated ,- (void)showUsingAnimation:(BOOL)animated 这个方法在上面已经做过注释,不再细说,不过有两小点值得我们注意,第一点是 - (void)showUsingAnimation:(BOOL)animated 在执行过程中调用了一个方法 - (void)setNSProgressDisplayLinkEnabled:(BOOL)enabled,先来看下这个方法
 1
 2
 3
 4
 5
 6
 7
 8
 9
10
11
12
|
- (void)setNSProgressDisplayLinkEnabled:(BOOL)enabled {

    /// 这里使用 CADisplayLink,是因为如果使用 KVO 机制会非常消耗主线程(因为 NSProgress 频率非常快)
    if (enabled && self.progressObject) {
        /// 创建 CADisplayLink 对象
        if (!self.progressObjectDisplayLink) {
            self.progressObjectDisplayLink = [CADisplayLink displayLinkWithTarget:self selector:@selector(updateProgressFromProgressObject)];
        }
    } else {
        self.progressObjectDisplayLink = nil;
    }
}
|
这个方法是关于 CADisplayLink 的,CADisplayLink 是一个能让我们以和屏幕刷新率相同的频率将内容画到屏幕上的定时器。我们在应用中创建一个新的 CADisplayLink 对象,把它添加到一个runloop 中,并给它提供一个 target 和 selector 在屏幕刷新的时候调用。一旦 CADisplayLink 以特定的模式注册到 runloop 之后,每当屏幕需要刷新,runloop 就会向 CADisplayLink 指定的 target 发送一次指定的 selector 消息, CADisplayLink 类对应的 selector 就会被调用一次。
- (void)showUsingAnimation:(BOOL)animated 这个方法中还有一点值得注意,就是只有具有动画效果的前提下,即 animated 为真时才会调用 - (void)animateIn:(BOOL)animatingIn withType:(MBProgressHUDAnimation)type completion:(void(^)(BOOL finished))completion 这个方法,下面我们再一起来看下这个方法。
 1
 2
 3
 4
 5
 6
 7
 8
 9
10
11
12
13
14
15
16
17
18
19
20
21
22
23
24
25
26
27
28
29
30
31
32
33
34
35
36
37
38
39
40
41
42
43
44
45
46
47
|
/// animated 为真时调用,消失或出现时的伸缩效果,以及透明度
- (void)animateIn:(BOOL)animatingIn withType:(MBProgressHUDAnimation)type completion:(void(^)(BOOL finished))completion {
    /// 自动确定正确的缩放动画类型,关于 MBProgressHUDAnimation 的几种类型,上文已全部列出,这里不再详细介绍
    if (type == MBProgressHUDAnimationZoom) {
        type = animatingIn ? MBProgressHUDAnimationZoomIn : MBProgressHUDAnimationZoomOut;
    }

    /// CGAffineTransformMakeScale 中的两个参数,分别代表x和y方向缩放倍数
    CGAffineTransform small = CGAffineTransformMakeScale(0.5f, 0.5f);
    CGAffineTransform large = CGAffineTransformMakeScale(1.5f, 1.5f);

    /// 设定初始状态
    UIView *bezelView = self.bezelView;
    if (animatingIn && bezelView.alpha == 0.f && type == MBProgressHUDAnimationZoomIn) {
        bezelView.transform = small; /// 缩放
    } else if (animatingIn && bezelView.alpha == 0.f && type == MBProgressHUDAnimationZoomOut) {
        bezelView.transform = large; /// 扩大
    }

    /// 创建动画任务
    dispatch_block_t animations = ^{
        if (animatingIn) {
            bezelView.transform = CGAffineTransformIdentity;
        } else if (!animatingIn && type == MBProgressHUDAnimationZoomIn) {
            bezelView.transform = large;
        } else if (!animatingIn && type == MBProgressHUDAnimationZoomOut) {
            bezelView.transform = small;
        }

    /// 方法弃用告警
#pragma clang diagnostic push
#pragma clang diagnostic ignored "-Wdeprecated-declarations"
        bezelView.alpha = animatingIn ? self.opacity : 0.f;
#pragma clang diagnostic pop
        self.backgroundView.alpha = animatingIn ? 1.f : 0.f;
    };

    /// 动画的两种形式,>= iOS7 的是一种形式,iOS7以下是另一种
#if __IPHONE_OS_VERSION_MAX_ALLOWED >= 70000 || TARGET_OS_TV
    if (kCFCoreFoundationVersionNumber >= kCFCoreFoundationVersionNumber_iOS_7_0) {
        /// 只支持 >= iOS7
        [UIView animateWithDuration:0.3 delay:0. usingSpringWithDamping:1.f initialSpringVelocity:0.f options:UIViewAnimationOptionBeginFromCurrentState animations:animations completion:completion];
        return;
    }
#endif
    [UIView animateWithDuration:0.3 delay:0. options:UIViewAnimationOptionBeginFromCurrentState animations:animations completion:completion];
}
|
- (void)animateIn:(BOOL)animatingIn withType:(MBProgressHUDAnimation)type completion:(void(^)(BOOL finished))completion 这个方法,无论是处于 show 状态还是处于 hide 状态,都会调用,下边我们再一起看下 hide 系列的一些方法。
三、hide 系列方法
这一部分主要是隐藏 HUD 窗口时调用的方法及代码分析
关于隐藏 HUD 窗口,MBProgressHUD 给我们提供的方法有以下几个:
1
2
3
4
5
6
7
8
|
/// 找到最上层的 HUD subview 并把它隐藏,成功为YES、其他情况为 NO
+ (BOOL)hideHUDForView:(UIView *)view animated:(BOOL)animated;

//隐藏HUD控件,animated控制是否显示动画。对应于- (void)showAnimated:(BOOL)animated;
- (void)hideAnimated:(BOOL)animated;

//在delay时间之后隐藏HUD,animated控制显示动画与否,delay控制延迟时间
- (void)hideAnimated:(BOOL)animated afterDelay:(NSTimeInterval)delay;
|
最常用的是后面两个: - (void)hideAnimated:(BOOL)animated 和 - (void)hideAnimated:(BOOL)animated afterDelay:(NSTimeInterval)delay,这两个方法的本质是相同的,不同的只是形式,也就是说这两个方法的实现流程基本上是一致的,只不过 - (void)hideAnimated:(BOOL)animated afterDelay:(NSTimeInterval)delay 多执行一两个方法而已。下面我们就来具体分析下 hide 系列的方法。
- 首先还是来说说
+ (BOOL)hideHUDForView:(UIView *)view animated:(BOOL)animated这个函数,如果调用这个方法来隐藏 HUD 窗口,那么会先调用两个方法:
 1
 2
 3
 4
 5
 6
 7
 8
 9
10
11
12
13
14
15
16
17
18
19
20
21
22
|
+ (BOOL)hideHUDForView:(UIView *)view animated:(BOOL)animated {
	/// 获取当前 view 的最上面的 HUD
    MBProgressHUD *hud = [self HUDForView:view];
    if (hud != nil) {
    	/// 移除 HUD 窗口
        hud.removeFromSuperViewOnHide = YES;
        [hud hideAnimated:animated];
        return YES;
    }
    return NO;
}

+ (MBProgressHUD *)HUDForView:(UIView *)view {
	/// NSEnumerator 是一个枚举器,依附于集合类(NSArray,NSSet,NSDictionary等),reverseObjectEnumerator 倒序遍历
    NSEnumerator *subviewsEnum = [view.subviews reverseObjectEnumerator];
    for (UIView *subview in subviewsEnum) {
        if ([subview isKindOfClass:self]) {
            return (MBProgressHUD *)subview;
        }
    }
    return nil;
}
|
当执行完上面这两个方法之后,接下来执行的方法和调用- (void)hideAnimated:(BOOL)animated隐藏 HUD 窗口时执行的方法相同,所以下边会详细分析。
- 接下来说说调用
- (void)hideAnimated:(BOOL)animated afterDelay:(NSTimeInterval)delay 隐藏 HUD 窗口时的情况,上文已经说过,调用这个方法会比调用- (void)hideAnimated:(BOOL)animated 多执行一两个方法:
 1
 2
 3
 4
 5
 6
 7
 8
 9
10
|
- (void)hideAnimated:(BOOL)animated afterDelay:(NSTimeInterval)delay {
    /// 创建定时器,并把它加入到 NSRunLoop 中
    NSTimer *timer = [NSTimer timerWithTimeInterval:delay target:self selector:@selector(handleHideTimer:) userInfo:@(animated) repeats:NO];
    [[NSRunLoop currentRunLoop] addTimer:timer forMode:NSRunLoopCommonModes];
    self.hideDelayTimer = timer;
}

- (void)handleHideTimer:(NSTimer *)timer {
    [self hideAnimated:[timer.userInfo boolValue]];
}
|
由上面代码可以清晰的看出,- (void)hideAnimated:(BOOL)animated afterDelay:(NSTimeInterval)delay 这个方法中加了一个定时器,当执行完这个定时器的selector时,就会执行- (void)hideAnimated:(BOOL)animated方法。
- 由此可见无论使用哪种方法隐藏 HUD 窗口,最终都会来到这个方法,
- (void)hideAnimated:(BOOL)animated,接下来我们就来分析下这个方法的具体调用流程,先看个图:
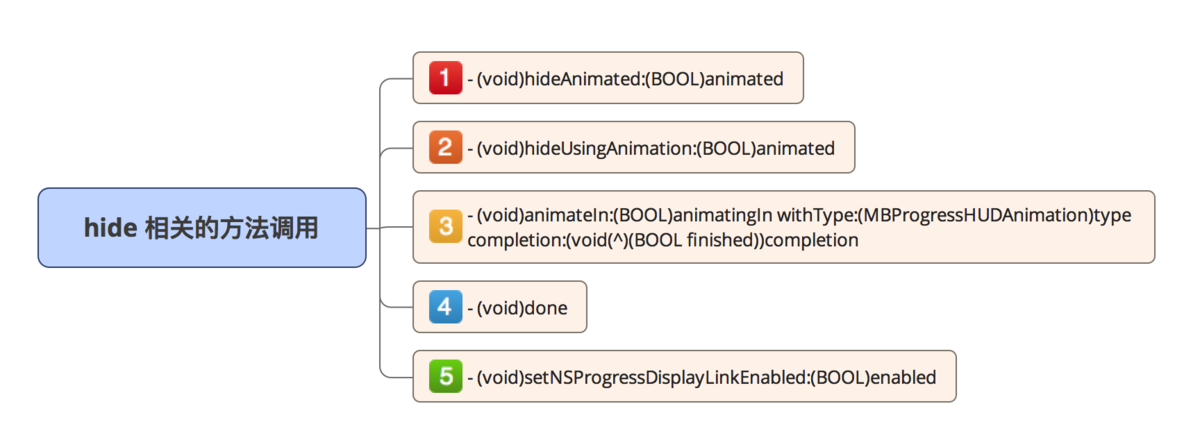
上图显示的是 hide 相关的方法调用,只罗列了几个主要方法。接下来我们就来分析下这几个主要方法。先来到- (void)hideAnimated:(BOOL)animated方法中:
 1
 2
 3
 4
 5
 6
 7
 8
 9
10
11
12
13
14
15
16
17
18
19
20
21
22
23
24
25
26
|
- (void)hideAnimated:(BOOL)animated {
    MBMainThreadAssert();
    [self.graceTimer invalidate];
    self.useAnimation = animated;
    self.finished = YES;

    /// 如果设置了最小显示时间,则执行此步骤,否则直接隐藏
    if (self.minShowTime > 0.0 && self.showStarted) {
        NSTimeInterval interv = [[NSDate date] timeIntervalSinceDate:self.showStarted];

        /// 如果 minShowTime 比较大,则暂时不触发 HUD 的隐藏,而是启动一个 NSTimer
        if (interv < self.minShowTime) {
            /// 创建定时器,并把它加入到 NSRunLoop 中
            NSTimer *timer = [NSTimer timerWithTimeInterval:(self.minShowTime - interv) target:self selector:@selector(handleMinShowTimer:) userInfo:nil repeats:NO];
            [[NSRunLoop currentRunLoop] addTimer:timer forMode:NSRunLoopCommonModes];
            self.minShowTimer = timer;
            return;
        }
    }
    /// 直接隐藏 HUD
    [self hideUsingAnimation:self.useAnimation];
}

- (void)handleMinShowTimer:(NSTimer *)theTimer {
    [self hideUsingAnimation:self.useAnimation];
}
|
从上面代码块中可以看出,无论我们有没有设置最小显示时间 self.minShowTime,都会触发 - (void)hideUsingAnimation:(BOOL)animated 这个方法,因此程序最后都会来到 - (void)hideUsingAnimation:(BOOL)animated 这个方法中:
 1
 2
 3
 4
 5
 6
 7
 8
 9
10
11
12
13
14
|
- (void)hideUsingAnimation:(BOOL)animated {
    if (animated && self.showStarted) {
        /// 将 showStarted 设为 nil
        self.showStarted = nil;
        [self animateIn:NO withType:self.animationType completion:^(BOOL finished) {
            [self done];
        }];
    } else {
        self.showStarted = nil;
        self.bezelView.alpha = 0.f;
        self.backgroundView.alpha = 1.f;
        [self done];
    }
}
|
这个方法和 show 系列的 - (void)showUsingAnimation:(BOOL)animated 方法一样,只要设定 animated 的属性为 YES,最终都会走到 - (void)animateIn:(BOOL)animatingIn withType:(MBProgressHUDAnimation)type completion:(void(^)(BOOL finished))completion 这个方法中,同时会执行一个方法:- (void)done,接下来我们来看一下这两个方法:
 1
 2
 3
 4
 5
 6
 7
 8
 9
10
11
12
13
14
15
16
17
18
19
20
21
22
23
24
25
26
27
28
29
30
31
32
33
34
35
36
37
38
39
40
41
42
43
44
45
46
47
48
49
50
51
52
53
54
55
56
57
58
59
60
61
62
63
64
65
66
67
68
69
70
71
|
/// animated 为真时调用,消失或出现时的伸缩效果,以及透明度
- (void)animateIn:(BOOL)animatingIn withType:(MBProgressHUDAnimation)type completion:(void(^)(BOOL finished))completion {
    /// 自动确定正确的缩放动画类型,关于 MBProgressHUDAnimation 的几种类型,上文已全部列出,这里不再详细介绍
    if (type == MBProgressHUDAnimationZoom) {
        type = animatingIn ? MBProgressHUDAnimationZoomIn : MBProgressHUDAnimationZoomOut;
    }

    /// CGAffineTransformMakeScale 中的两个参数,分别代表x和y方向缩放倍数
    CGAffineTransform small = CGAffineTransformMakeScale(0.5f, 0.5f);
    CGAffineTransform large = CGAffineTransformMakeScale(1.5f, 1.5f);

    /// 设定初始状态
    UIView *bezelView = self.bezelView;
    if (animatingIn && bezelView.alpha == 0.f && type == MBProgressHUDAnimationZoomIn) {
        bezelView.transform = small; /// 缩放
    } else if (animatingIn && bezelView.alpha == 0.f && type == MBProgressHUDAnimationZoomOut) {
        bezelView.transform = large; /// 扩大
    }

    /// 创建动画任务
    dispatch_block_t animations = ^{
        if (animatingIn) {
            bezelView.transform = CGAffineTransformIdentity;
        } else if (!animatingIn && type == MBProgressHUDAnimationZoomIn) {
            bezelView.transform = large;
        } else if (!animatingIn && type == MBProgressHUDAnimationZoomOut) {
            bezelView.transform = small;
        }

    /// 方法弃用告警
#pragma clang diagnostic push
#pragma clang diagnostic ignored "-Wdeprecated-declarations"
        bezelView.alpha = animatingIn ? self.opacity : 0.f;
#pragma clang diagnostic pop
        self.backgroundView.alpha = animatingIn ? 1.f : 0.f;
    };

    /// 动画的两种形式,>= iOS7 的是一种形式,iOS7以下是另一种
#if __IPHONE_OS_VERSION_MAX_ALLOWED >= 70000 || TARGET_OS_TV
    if (kCFCoreFoundationVersionNumber >= kCFCoreFoundationVersionNumber_iOS_7_0) {
        /// 只支持 >= iOS7
        [UIView animateWithDuration:0.3 delay:0. usingSpringWithDamping:1.f initialSpringVelocity:0.f options:UIViewAnimationOptionBeginFromCurrentState animations:animations completion:completion];
        return;
    }
#endif
    [UIView animateWithDuration:0.3 delay:0. options:UIViewAnimationOptionBeginFromCurrentState animations:animations completion:completion];
}

- (void)done {
    /// 取消 hideDelayTimer
    [self.hideDelayTimer invalidate];
    /// 隐藏 NSProgress 对象
    [self setNSProgressDisplayLinkEnabled:NO];

    if (self.hasFinished) {
        self.alpha = 0.0f;
        if (self.removeFromSuperViewOnHide) {
            /// 从父视图中移除
            [self removeFromSuperview];
        }
    }
    MBProgressHUDCompletionBlock completionBlock = self.completionBlock;
    if (completionBlock) {
        completionBlock();
    }
    id<MBProgressHUDDelegate> delegate = self.delegate;
    if ([delegate respondsToSelector:@selector(hudWasHidden:)]) {
        [delegate performSelector:@selector(hudWasHidden:) withObject:self];
    }
}
|
关于 - (void)animateIn:(BOOL)animatingIn withType:(MBProgressHUDAnimation)type completion:(void(^)(BOOL finished))completion 这个方法,只要 animated 的属性为 YES,都会调用;而在- (void)done 这个方法中,如果 removeFromSuperViewOnHide 属性为 YES,则将自己从父视图上移除;如果有 completionBlock 回调函数,则执行回调;如果实现了代理并实现了代理方法,则执行代理方法。而且我们还观察到在 hide 时,也会调用 - (void)setNSProgressDisplayLinkEnabled:(BOOL)enabled 方法,只是在 hide 时 enabled 为 NO。
 1
 2
 3
 4
 5
 6
 7
 8
 9
10
11
12
|
- (void)setNSProgressDisplayLinkEnabled:(BOOL)enabled {

    /// 这里使用 CADisplayLink,是因为如果使用 KVO 机制会非常消耗主线程(因为 NSProgress 频率非常快)
    if (enabled && self.progressObject) {
        /// 创建 CADisplayLink 对象
        if (!self.progressObjectDisplayLink) {
            self.progressObjectDisplayLink = [CADisplayLink displayLinkWithTarget:self selector:@selector(updateProgressFromProgressObject)];
        }
    } else {
        self.progressObjectDisplayLink = nil;
    }
}
|
over