UITextView 实现占位文本的方式有很多种,网上一搜一大把,,这里只介绍 最简单 的一种,如标题所述:用 RunTime 为 UITextView 设置占位文本并实时改变文本框占位文本的颜色。
对 RunTime 不太了解的童鞋可以简单看下这篇文章:iOS开发之 - Runtime,懒得点击鼠标的话我这里也简单的说下,Runtime 简称运行时,是苹果官方的一套比较底层的纯 C 语言 API, 用它可以做很多底层操作(比如访问隐藏的成员变量和方法)。
OK,足够了,接下来我们就抓紧时间来看看如何用 RunTime 为 UITextView 设置占位文本并实时改变文本框占位文本的颜色。。。
思路
首先我们利用 RunTime 获取一下 UITextView 中一些隐藏的成员变量
 1
 2
 3
 4
 5
 6
 7
 8
 9
10
11
12
13
14
15
16
17
18
|
- (void)viewDidLoad {
    [super viewDidLoad];

    //  获取 UITextView 中所有的成员变量
    unsigned int count = 0;
    Ivar *ivars = class_copyIvarList([UITextView class], &count);

    for (int i = 0; i < count; i ++) {
        Ivar ivar = ivars[i];
        // ivar_getName(ivar) 意思是获取成员变量名字,如果想获得成员变量的类型用这个 ivar_getTypeEncoding(ivar)
        const char *name = ivar_getName(ivar);
        NSString *objcName = [NSString stringWithUTF8String:name];

        NSLog(@"    %d     %@    ", i, objcName);
    }
    // 释放
    free(ivars);
}
|
打印结果如下(这里直接放截图)
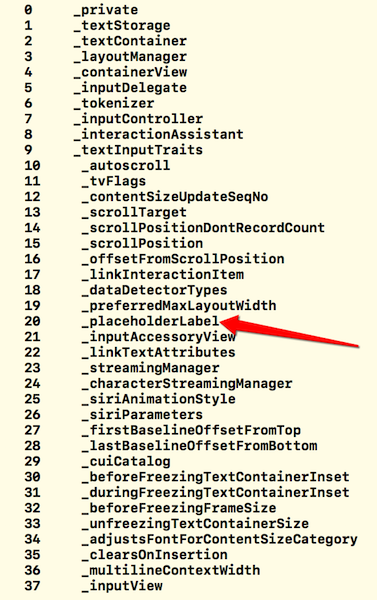
从上面的截图中我们可以看出,打印的结果里有一个 placeHolderLabel 的私有变量,即 UITextView 类内部有一个名为“_placeHolderLabel”的私有成员变量。那么就简单多了,我们现在就对这个私有变量进行操作。具体的步骤如下:
 1
 2
 3
 4
 5
 6
 7
 8
 9
10
11
12
13
14
15
16
17
18
|
- (void)setupTextView {
    _textView = [[UITextView alloc] initWithFrame:CGRectMake(0, 50, [UIScreen mainScreen].bounds.size.width, 200)];
    _textView.delegate = self;
    _textView.tintColor = [UIColor whiteColor];
    _textView.font = [UIFont systemFontOfSize:15.f];
    _textView.backgroundColor =[UIColor grayColor];
    [self.view addSubview:_textView];

    UILabel *placeholderLabel = [[UILabel alloc] init];
    placeholderLabel.text = @"请输入内容请输入内容请输入内容请输入内容请输入内容请输入内容请输入内容请输入内容请输入内容请输入内容请输入内容";
    placeholderLabel.font = [UIFont systemFontOfSize:15.f];
    placeholderLabel.textColor = [UIColor whiteColor];
    placeholderLabel.numberOfLines = 0;
    [placeholderLabel sizeToFit];
    [_textView addSubview:placeholderLabel];

    [_textView setValue:placeholderLabel forKey:@"_placeholderLabel"];
}
|
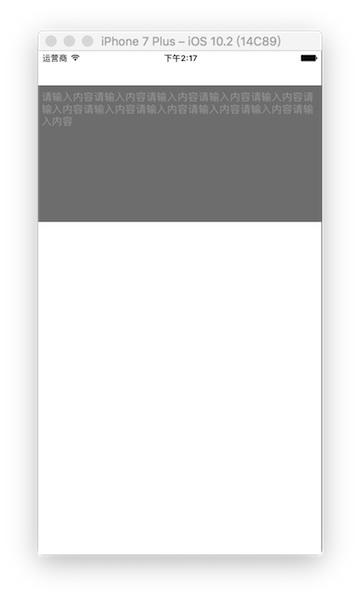
上面代码做的事情,无非是创建一个 UITextView 和一个 UILabel 控件,然后通过键值对的原理给 UITextView 中的 _placeholderLabel 这一属性赋值,,,就不详细注释了,重要的是这种思想。。。只需上面这段代码,我们就已经完成了利用 RunTime 为 UITextView 设置占位文本。效果图如下,比较丑但很实用😂:
接下来我们开始实时改变文本框占位文本的颜色。
举个栗子:当我们开始输入时占位文本是白色,结束输入时占位文本是灰色。那我们在哪里设置比较好呢?我在 UITextViewDelegate 中找到了两个方法,可以解决我们的需求
1
2
|
- (BOOL)textViewShouldBeginEditing:(UITextView *)textView;
- (BOOL)textViewShouldEndEditing:(UITextView *)textView;
|
看名字就能猜到这俩方法是干嘛的了,这里不再多说,,,我们需要在这两个方法里进行一些操作,先贴代码。
 1
 2
 3
 4
 5
 6
 7
 8
 9
10
11
12
13
14
15
16
17
18
19
|
#pragma mark - UITextViewDelegate
#pragma mark - 开始编辑 UITextView
- (BOOL)textViewShouldBeginEditing:(UITextView *)textView {
    // 设置高亮时,占位文字颜色为白色
    [_textView setValue:[UIColor whiteColor] forKeyPath:@"_placeholderLabel.textColor"];
    // 设置光标颜色为白色
    _textView.tintColor = [UIColor whiteColor];
    return YES;
}

#pragma mark - 结束编辑 UITextView
- (BOOL)textViewShouldEndEditing:(UITextView *)textView {

    // 设置非高亮状态下,占位文字颜色为 lightGrayColor
    [_textView setValue:[UIColor lightGrayColor] forKeyPath:@"_placeholderLabel.textColor"];
    // 设置光标颜色为 lightGrayColor
    _textView.tintColor = [UIColor lightGrayColor];
    return YES;
}
|
和上文设置占位文本的思想一样,这里也是 根据键值对的原理给 _placeholderLabel.textColor 赋值,开始编辑时设置为白色,结束编辑时设置为 lightGrayColor,具体请看代码中的注释。
到这里实时改变文本框占位文本的颜色也搞定了,是不是觉得很简单,先看下效果图(比较丑但很使用😂),文章结尾我会再次贴出完整的代码。。。自己以后看着方便,也可以帮助有需要的道友少走弯路,,不过文章如果有需要改正或改进的地方,还希望各位同行能多多指点。
效果图
在需要 UITextView 的页面进行设置,NNViewController.h 中没有相关操作,直接在NNViewController.m 中进行设置即可,当然如果项目中用到 UITextView 这个类比较多的话,你也可以简单封装一下,以便多次利用。。。
代码
 1
 2
 3
 4
 5
 6
 7
 8
 9
10
11
12
13
14
15
16
17
18
19
20
21
22
23
24
25
26
27
28
29
30
31
32
33
34
35
36
37
38
39
40
41
42
43
44
45
46
47
48
49
50
51
52
53
54
55
56
57
58
59
60
61
62
63
64
65
66
67
68
69
70
71
72
73
74
75
76
77
78
79
|
#import "NNViewController.h"
#import <objc/runtime.h>

@interface NNViewController ()<UITextViewDelegate> {
    UITextView *_textView;
}

@end

@implementation NNViewController

- (void)viewDidLoad {
    [super viewDidLoad];

    //  获取 UITextView 中所有的成员变量
    unsigned int count = 0;
    Ivar *ivars = class_copyIvarList([UITextView class], &count);

    for (int i = 0; i < count; i ++) {
        Ivar ivar = ivars[i];
        // ivar_getName(ivar) 意思是获取成员变量名字,如果想获得成员变量的类型用这个 ivar_getTypeEncoding(ivar)
        const char *name = ivar_getName(ivar);
        NSString *objcName = [NSString stringWithUTF8String:name];

        NSLog(@"    %d     %@    ", i, objcName);
    }
    // 释放
    free(ivars);
        [self setupTextView];
}


- (void)setupTextView {
    _textView = [[UITextView alloc] initWithFrame:CGRectMake(0, 50, [UIScreen mainScreen].bounds.size.width, 200)];
    _textView.delegate = self;
    _textView.tintColor = [UIColor lightGrayColor];
    _textView.font = [UIFont systemFontOfSize:15.f];
    _textView.backgroundColor =[UIColor grayColor];
    [self.view addSubview:_textView];

    UILabel *placeholderLabel = [[UILabel alloc] init];
    placeholderLabel.text = @"请输入内容请输入内容请输入内容请输入内容请输入内容请输入内容请输入内容请输入内容请输入内容请输入内容请输入内容";
    placeholderLabel.font = [UIFont systemFontOfSize:15.f];
    placeholderLabel.textColor = [UIColor lightGrayColor];
    placeholderLabel.numberOfLines = 0;
    [placeholderLabel sizeToFit];
    [_textView addSubview:placeholderLabel];

    [_textView setValue:placeholderLabel forKey:@"_placeholderLabel"];
}

#pragma mark - UITextViewDelegate
#pragma mark - 开始编辑 UITextView
- (BOOL)textViewShouldBeginEditing:(UITextView *)textView {
    // 设置高亮时,占位文字颜色为白色
    [_textView setValue:[UIColor whiteColor] forKeyPath:@"_placeholderLabel.textColor"];
    // 设置光标颜色为白色
    _textView.tintColor = [UIColor whiteColor];
    return YES;
}

#pragma mark - 结束编辑 UITextView
- (BOOL)textViewShouldEndEditing:(UITextView *)textView {

    // 设置非高亮状态下,占位文字颜色为 lightGrayColor
    [_textView setValue:[UIColor lightGrayColor] forKeyPath:@"_placeholderLabel.textColor"];
    // 设置光标颜色为 lightGrayColor
    _textView.tintColor = [UIColor lightGrayColor];
    return YES;
}

#pragma mark - 点击空白页面时收回键盘
- (void)touchesBegan:(NSSet<UITouch *> *)touches withEvent:(UIEvent *)event {
    [self.view endEditing:YES];
}

@end
|